
The Dawn of Adventure: A New Player's Guide to Rift

Whether you are new or returning to the game after years of play, there will be questions that occur. Sure some of the things are standard MMORPG, but how do you find them or do them. This guide was written to describe what you will see in the first ten levels of the game.
Character Creation
There are several steps to character creation. The first one is to decide if you want to be a Guardian or a Defiant. The great thing with the game now is that in PvE outside the main cities both sides can play together and be in the same guild. When we started this game we were primarily Guardian, but later started a Defiant guild. We could not even talk to each other in game unless we used a private channel that we created. No more worries about that! I made a character from scratch for this guide and put her on the Guardian side.
The next step is to pick your race and gender. The three races of choice will appear on the left and with models of both sexes. The choice you pick will have random starter avatar in the center of the screen for you to check out. Don’t fret! You will have options to change the look, but not yet.
What is your calling? This is better known as class in a lot of games. Your choices will be: Warrior, Cleric, Mage or Rogue for the standard game. If you have the Primalist Calling Pack, Primalist will be a fifth option.
Each calling initially allows you to choose three roles that you can focus on to support a group. The possible roles are Tank, Damage (DPS), Support, and Healer. There is a way to have all four for any character, but you need to add the Dream Soul Pack to the game. The available preset builds are recommendations and can be a good tool to learn from, but you can also create your own. So pick your purpose from the ones open for your calling and game setup. More information about how the Soul Tree works within a role is described later in the section called “The Fun of Leveling”.
After this you will reach the screen where you can adjust the character’s size, coloring, etc. It’s a pretty standard setup that uses a grid to click on or a sliding bar to change things. If you are not into toying with your character looks you can chose from several presets to get running in the game faster.
Once you save your character you will be entered into a cinematic with the history of the Guardians or Defiants based on which side you chose. If you are here for the first time, this can be fun to watch, but like most games, hitting escape will end it and put you at the start of the game.
Settings and the UI
Let’s talk some about these before I dive into the actual game play.
One of the first things to check in your graphic settings is what quality video is set. Despite my system, it decided to set me up at low quality without a lot of distance. That will explain some of my pictures, since I was not playing in ultimate mode when I did my run for this guide. Thus, I tell you now.
In game, click on the computer icon on the bottom left to pull up the system menu. Choose settings – video – advanced. The settings window should now show near the top a slide bar from low to custom for the video quality. Each “min” to “ultra” choice has a preset. If you tweak any of the preset options on a quality choice, it automatically changes it to a custom setup. I think that is a good thing so you know if you are truly playing with a preset quality or not. If you find a custom setup works for you, it’s a good idea to note your settings somewhere in case you need to reset them. If you want to get to the settings from the character select screen, it is the settings button at the bottom of the screen.
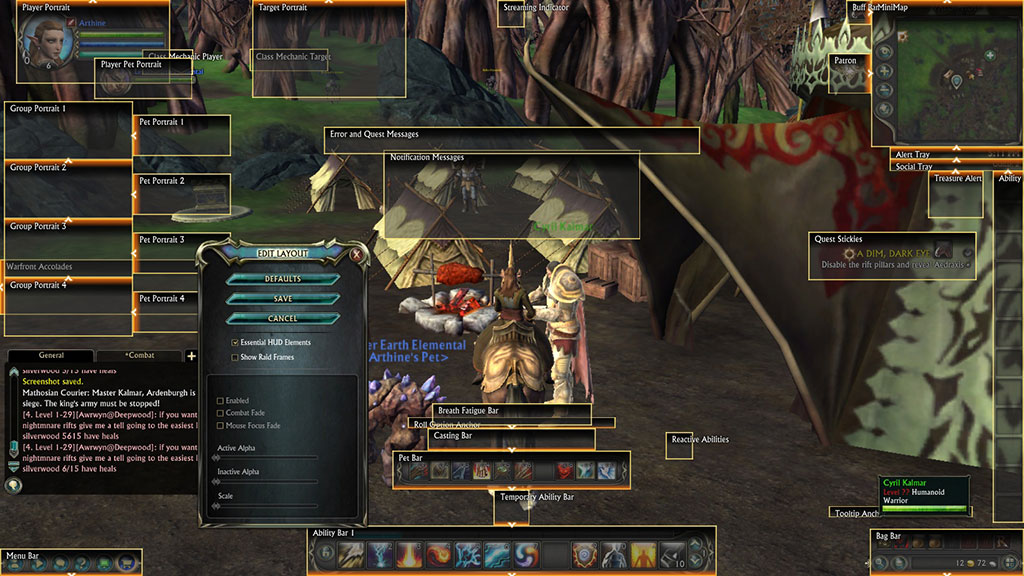
Another thing people like to do is rearrange their UI. I found I needed to do this when I decided to add more action bars for faster access to my skills rather than clicking to change what bar I was looking at.
Click on the computer icon on the bottom left for the system menu and choose edit layout. All items that you can move will be highlighted. Simply left click on the item you wish to move and drag it across the screen. Release the mouse button when you have it where you like. The window with the save button can also be dragged around so it is not in the way of what you are moving. Each window can also be resized with drag options.
When you have the layout the way you like, click save and you will be returned to game mode. If you do not like what you did, you can hit escape. You can also use the edit layout to return to the default settings by hitting reset.
To add further action bars to the game, go to settings and chose interface and then action bars. To adjust what bars you see on your screen click on the drop down menu for bottom and side. You can have up to 7 at the bottom of your screen and four on the side. I prefer to have one on the side for skills I do not use in combat and at least two on the bottom for higher level characters with more skills for faster ease of keying or clicking in commands for fighting. The main action bar will also scroll through several by clicking the up and down arrows on the right. This is a good place to put skills you will want to use, but only for specific non-combat times so you have time to move to it and have all the associated skills ready for use. My suggestions are there for things to think about as you play.
Many other settings are available to change the colors of things if you do not like them and to change the keybindings. I will let you explore the other options in settings on your own now that I helped you get your feet wet with some of the primary things players like to change.
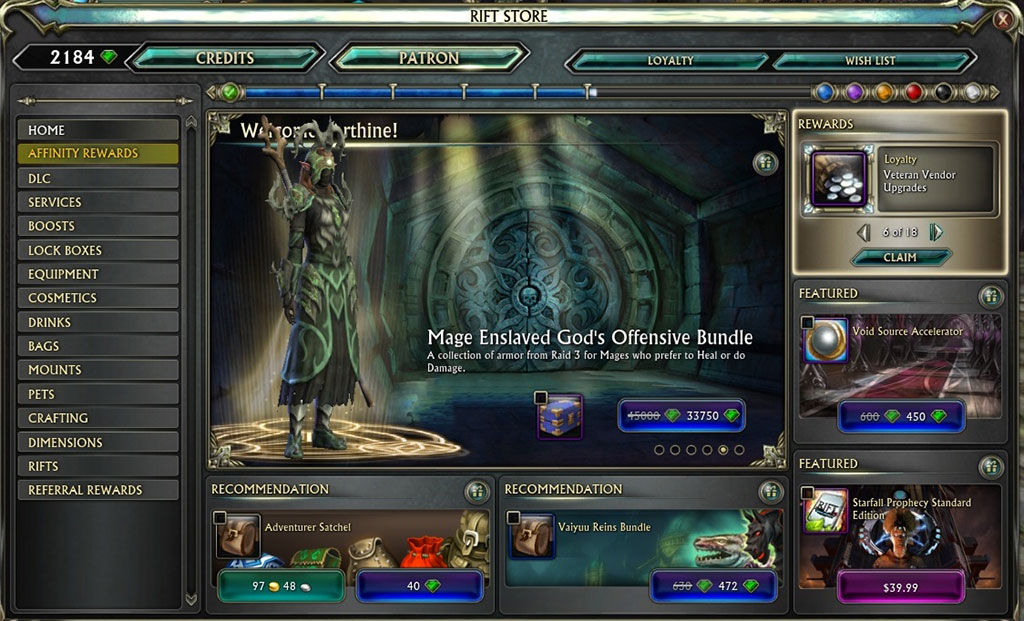
Game Store
A shopping cart icon is included in the menu icons at the bottom left of the screen. A window will appear that will allow you to search for both in-game and out of game items. There are several ways to pay for items and each will list all options available and their costs. Some of the payment options are based on the character’s actions in the game and items they have accumulated through quests and closing rifts. Each character will have a different amount of these in game materials to shop with. Credits are an account wide item that can be bought with real cash.
You can also sign up as a patron (subscription) through this window and gain those extra perks. You will see what some of the perks are as you play, but one example is a bonus to the experience points (XP) and the cash you get for your quest rewards. Personally, I think you can level fast enough playing the game, especially doing instanced adventures, without this added perk.
Playing the Game
Now that I shared the character creation and some of the main setting options, let’s get to understanding how to play the game.
Questing
Once the opening cinematic is completed, your character will appear in the game. In front of you should be an NPC with an icon over their head that is green with ‘!’ in it. This icon signifies the NPC has a new quest to give to you. Right click on them and a window will open where they will tell you what they would like you to do and what your rewards will be if you complete the quest.
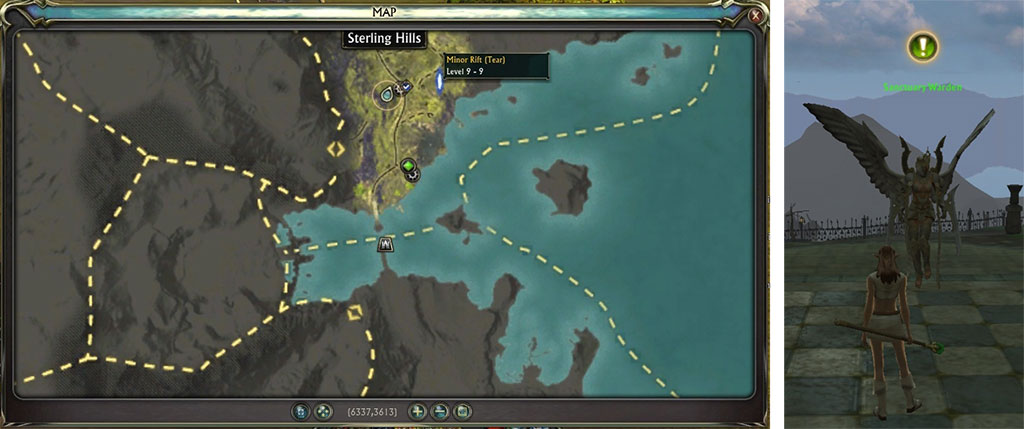
Your mini-map in the upper right hand corner, and the full map that you can pull up by pressing ‘M’, will show the location of your quest objectives either by highlighted circles or star-like pinpoints. If a point is off the mini-map it will be at the edge of the mini-map with an arrow pointing the direction from where you are.
Another thing to note about the map is that any area that your character has not explored yet will be grayed out. Once you have traveled far enough into an area, the map will light up to show the terrain. The map in the picture supplied here is in the starting area of the Guardians outside the initial tutorial phase.
The quests will not always have you handing in quests to the person that you acquired them from. Some will have you acquire items on the way or some will simply tell you to go talk to someone else. Complete all the quests as you go, to ensure you do not miss anything. In the beginning, a lot of the quests also teach you how to play the game. Some quests don’t have a hand-in spot, but will pop up as an icon under the minimap with a bag icon in its center to click to claim your rewards.
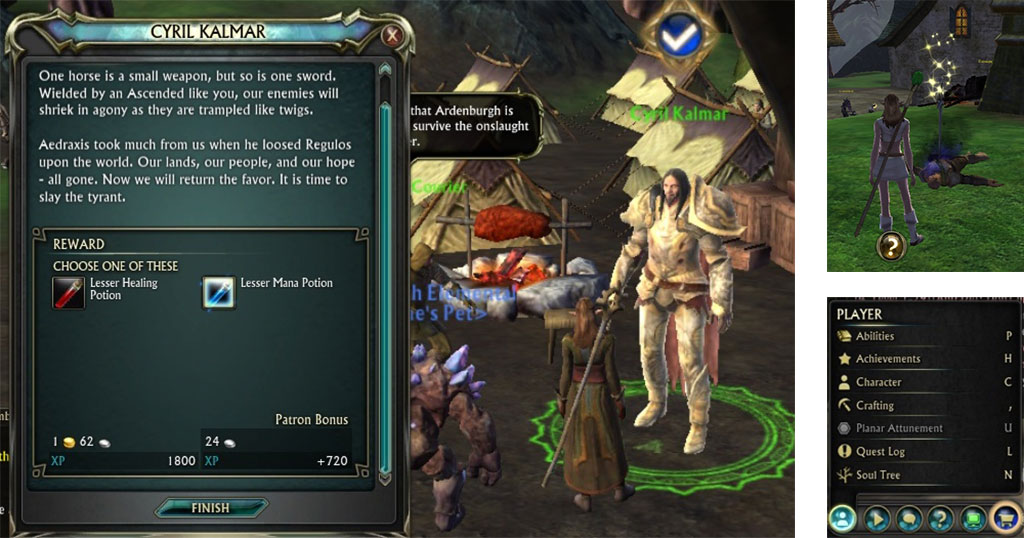
To know where to hand in a quest a blue circle with a checkmark will appear on your map and over the head of the NPC you must talk to. Right click on them to initiate the dialogue to complete the quest. Some quests will have you chose an item from several before you can click on the ‘Finish’ button. Simply left click the item you would like, to highlight it. Items you cannot use will be overlaid with red.
Quests that are in progress will show in a list on the right side of the screen with some simple information about them. If you hover over the little circle with the checkmark in it on the right side of the quest name you will see that left clicking it will bring up that quest in your quest log and right clicking will mark it on your mini-map if it is not already there. The other way to get to your quest log is through the player menu via the head icon on the bottom left or pressing the ‘L’ key. The menus on the bottom left will have a letter on the right if there is a hot key for them.
Side note: If you do not like the initial keybind settings in the game, you can click on the system icon and chose “key bindings”. A window will pop up listing all of the items you can bind to a key and will show their default initially.
As you level and explore you will acquire quite a few more quests. They will show up in your quest log under various headings to help you find them by type. I like that there is a “profession” header so all my crafting and ‘gathering’ quests are there, out of the way of exploration and special quests.
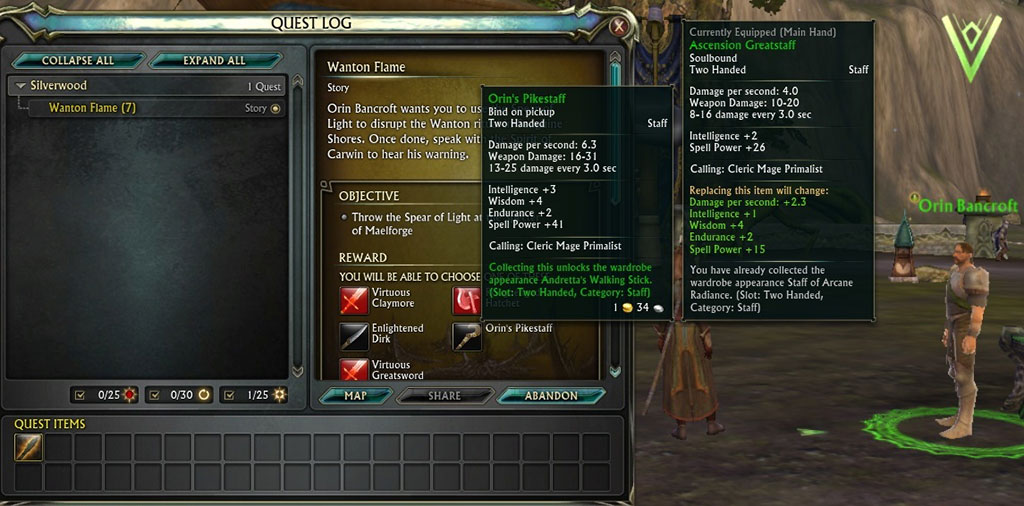
In the following window, I have the quest log open to compare what I have equipped to what I will get upon completing the quest. A ‘replacing this item’ section will appear on the equipped items info window and tell you the attributes that will increase or decrease and by how much. In this case, I will have a much better staff when I have completed this quest. You can see the same item comparisons by hovering over the item choices on the quest dialogue window when completing the quest, or hovering over items in your bags.
In the quest log, you will also see two rows of boxes at the bottom. This is where all of your quest items will go. They will never mix with your regular bag inventory. Some of them will be items you will have to ‘use’ during a quest and you have the option of moving these to an open action bar slot to save having the quest log open.
Interacting With Your World
I already stated that you right click on an NPC to talk to them. This right clicking also works to interact with other objects in the world. There will be plenty of things that ‘sparkle’ in the game. Anything that looks like it has sparkles on it can be right clicked and something will happen. Some will be notes you can read on monuments or tacked to a wall. Some of them are related to quest items you must pick up. There are also tons of collectibles that will show up as random shiny spots on the ground or as sparkling objects. Sparkles are a good thing in this game.
One thing to interact with that does not sparkle is the mailbox. It will be marked on the mini-map with an envelope icon. Each faction has their own design for their mailbox. I had not played in four years, but I had mail to check out on my new character. I am not sure what a new player might see, but it is a good idea to check your mail as soon as you see a mailbox. The one pictured here is the Guardian style mailbox.
Use ‘Tab’ to target an enemy or, if you have the time, you can also click on the one you really want. Whatever you have targeted, from NPC to enemy, will have a glowing circle around its feet and an arrow pointing down at its head. There are three colors for the NPCs and creatures in the game: green for friendly, yellow for an attackable passive mob, and red for an attackable aggressive mob. The red ones might decide to hit you first, so be wary. You will also see the target’s stat bar at the top of the screen to the right of your stat bar.
To fight with your enemy use the number keys associated with your skills on the primary action bar. As noted earlier with action bar setup, you can add more of these or shift through several that can appear on your main bar. You can also click on the associated skill icon on a bar to activate them, but I suggest you have the lock on the left of the main bar in the locked position or you might move them instead of activating them. You will need to unlock it again to change your skills around, but not to add new ones to empty slots. There are macros to help with your fighting, but that will be discussed in another article.
Make sure you right click on any downed enemy that has sparkles on them because they have loot. To check out your loot and any items you chose as quest rewards you will need to open your bags. To do this, you can either press ‘B’ for bags (I might change this to ‘I’ for inventory like so many newer games) or click on the bags slotted in the boxes at the bottom right of your screen.
To equip an item that is in a bag, right click on it. This also works with bags if you have an empty bag slot in the bottom right. Make sure you are paying attention if you are replacing an existing equipped item by comparing the item windows that will come up when hovering the mouse over the item in your bag. You can also unequip an item by right clicking it and it will appear in a bag. Once you get to a town with a banker you can also use the right click to move items in the bags to the bank and vice versa.
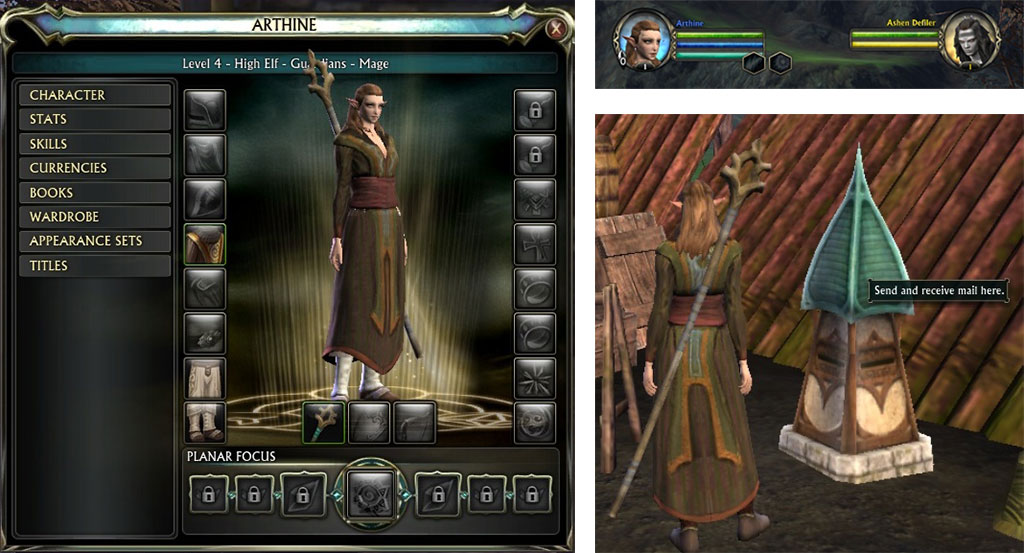
To view what your character has equipped and other stats you can press ‘C’ for character or chose character on the player menu. To see other information about your character you can left click on the menu items on the left of the window to have their information appear on the right.
To sell items, talk to any vendor. Right clicking on the item in your bag will sell it. There is a handy button at the bottom of the vendor window that states ‘sell grey items’. This is the fastest way to sell junk items you acquire from looting. Make sure you know what you are selling so you don’t accidentally sell an item you wanted to keep. If you do mistakenly sell an item, there is a ‘buy back’ button at the bottom of the vendor window. Right clicking on the sold item in the list will return the money you acquired to the vendor and put the item back in your bags.
Now that you have learned about questing and interacting with your world, let’s move on to what happens as you level and what important things you will have to pay attention to.
The Fun of Leveling
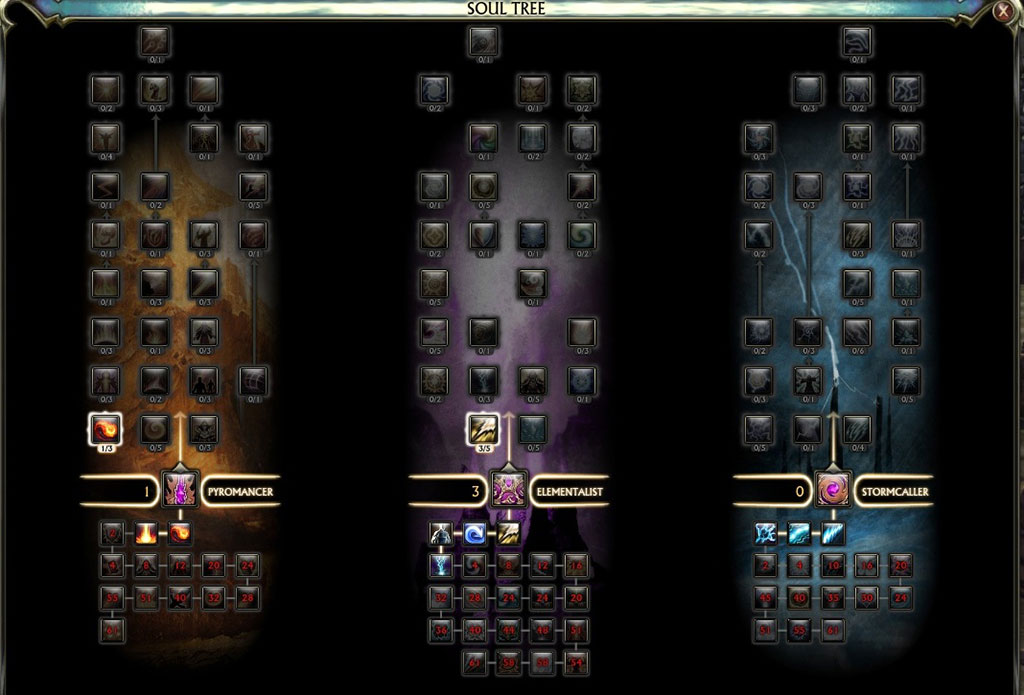
The blue bar along the top of your main action bar will tell you the progress achieved to the next level. Your level will show at the top of your character window and also at the bottom of your picture on the stat bar in the upper left of the screen. Whenever you level you will gain points to use in your soul tree to acquire new skills.
When you first selected your calling and role within it, the game was set to automatically apply the points if you want it to. A box will pop up on the left to ask if you want to spend your points. If you want the game to pick the slots for you, simply click it and it will automatically happen. However, you can see where it wants to apply the next point if you open the soul tree instead. You can do this from the player menu or by pressing ‘N’.
You can assign your points your own way by left clicking on the item you want to buy. You have to work from the bottom of the tree to the top. You will not have enough points to fill in all three trees for the chosen role so check them out some to see what you want to do. All the items listed on a tree can be hovered over to see what it will do. This allows you to explore your trees from the start.
Most of the items to learn can be advanced with several points to increase their effects. The total number you can spend is the number on the right and the amount spent is the number on the left.
Skills in the root of the tree are automatically learned as you spend your soul points. If lit up, you can put the skill on an action bar. Otherwise, it will have a number, which is the points that must be spent in the tree for the skill to be available. Not all skills will automatically show up on your action bar when they are available on your soul tree. You can drag and drop any that you know to your bars as you see fit. A handy new skill list box will open up on the left of the screen (default location) when you manually make the choices of where to spend the points.
As you level, you will have the chance to buy more roles than the one you started with. Each role will have its own setup with three souls to use. If you don’t like your build for any role, you can reset it and even change the souls used. There are a lot of guides out there about the souls and what they do, but many of the preset choices can be a lot of fun.
RIFTS!
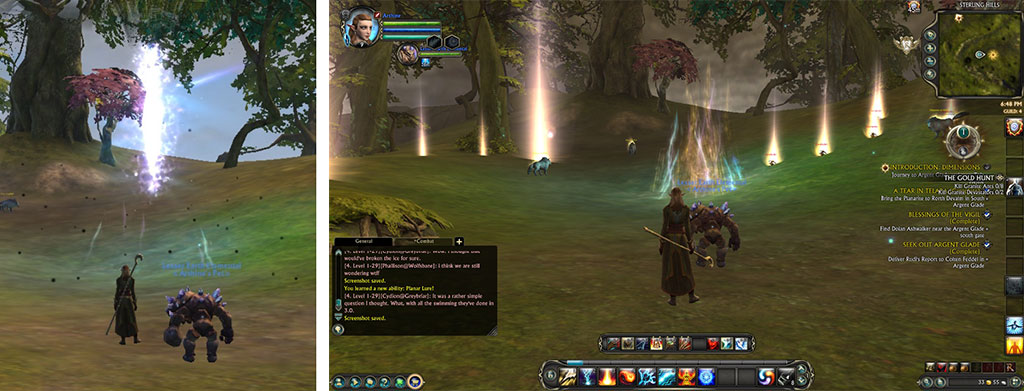
The reason for the game is the rifts! You will gain ascended powers to allow you to open tears. As you level you will gain access to lures that can guarantee the type of rift opened and the strength of it. In the beginning you will acquire the ability to use a standard planar lure. You will acquire this ability, open a rift via a tear, and have to close it by destroying the minions that come through to complete a quest.
During the fight the rift will go through stages. You can see this in the upper right under the mini map. There will be a number at the top to tell you the stage it is in. Some of the stages have to be completed in a designated time and a countdown clock will appear in the middle. At the end don’t forget to click the bag at the bottom to claim your loot. You will get some planar treasures that can be used for currency, crafting and other great things.
How do you find a tear? It will show up on the minimap if you are close enough and on the main map in any area you have explored so far. It looks a lot like the shape of the tear when up close. If you hover your mouse over the tear marker on the map, it will tell you the level, which will match the level of the map area it is located in. Rifts will scale to the size of the group attacking them. All of them will be a public group that anyone can join. You can fight in one without joining the public group, but you might find some synergy with others if grouped with them.
Larger groups, like our guild, will open them most of the time with special lures and go rift hunting. There are even special lures for crafting rifts, we started calling the events for these crifting due to a slip of the tongue that has stuck for years.
So there is plenty to look forward to with rifts popping up all over the place. Tears can even turn into a rift without being opened by an ascended, but they can disappear, too. Don’t be afraid to solo them due to the balancing to players. However, never expect to be alone by the time it closes.
Crafting
You will find quests to teach you about fishing on the way to the first major town. This skill will not count as one of the three crafting professions you can have. There are quests and achievements for fishing just like everything else in this game. The other one that will not count is survival (cooking).
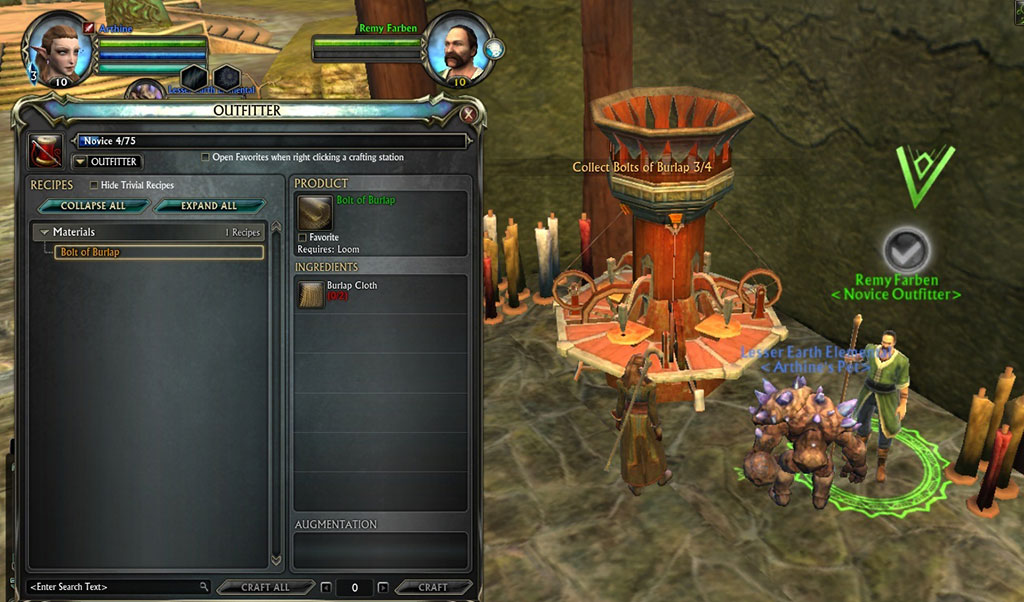
Once in the first major town (Argent Glade for the Guardian side) there will be several NPCs that will teach you about crafting. There are more than three professions and your foraging (plants/trees), butchering, and mining will each take a profession slot. I have plenty of crafting to figure out on the high level characters that my account still has after four years, but I decided for the purposes of this guide to do the following: foraging, artificer, and outfitter. This way I had the best chance of acquiring items I might use and then craft into items usable as a mage.
Major towns and the home city for your faction, will have crafting stations for you use. The list of recipes you can make will show on the left of the window. The full recipe detail and the buttons to select how many you want to make is on the left. The numbers on each item in the recipe will tell you how many you have and how many you need. The numbers will be red when you don’t have enough. The other great thing is that the total items available to use will include items in your bank. However, whatever you make will go into your inventory so make sure you have bag space for the newly created item(s).
Other Helpful Items
Chat
If you click on the button on the bottom left of the chat window you can chose the channel to talk in and see what the ‘/’ command is. If you type /chatlist and hit enter, it will list all of the chat channels you belong to. One of the channels you will see first is the Level 1-29 channel that allows you to talk worldwide to anyone in that channel. This game uses tell instead of whisper to talk privately to another player. You can even create custom channels you can invite people to which can be used for allies and friends not in the same guild.
Grouping
You will not want to play alone all the time or only in public groups at rifts. Hopefully you came with friends or even know of a guild you want to join. Grouping is pretty simple in this game and there are ways for different levels to play together.
Let’s start with the options you can find by right clicking on your character’s portrait on the status bar. On the menu you will find that you can make your group public, which is the default. You can make your group private and use the /invite ‘character name’ command for those you want in the group.
The next option on the menu is to have sidekicking enabled or not. It is a good idea to have this enabled as it allows you to be bumped, up or down, in level to match what the group is doing.
You can also set yourself to a mentoring level with 10 as the lowest and the highest being your level minus five. So my level 50 can mentor at level 10 to level 45. This is great for people with higher characters to come help out new players in the game. As a new player yourself, you will not be using this option for now, but you will encounter a quest to know how to do so at some point in your teens. Remember to turn it off when you are done with this tutorial quest so that you can continue fighting at your full level.
There is a Looking for Group option that is in the Activities menu. It can be opened by clicking the second button on the bottom left that looks like a ‘play’ button (triangle pointing right). Depending on your level, you will find several things to group for.
If you want to select only the dungeons you want to play in, click on Specific Dungeon at the bottom of the window. However, this requires patron status to utilize. Without patron status you can still see the list and the associated levels for the dungeons in the game. You can only enter the dungeons that have been unlocked by your level.
Instant Adventures
Instant Adventures are another option on the Activities menu that you will want to know about. These are great for leveling and will automatically set the character level to match. You must be at least level ten for this option to be available. There are three types of instant adventures that will scale from 1 to 20 players: Instant, Intrepid and Featured.
Guild Finder
Press ‘G’ and you can search for a guild. Most created by players will request you send a message to get an invite. There is a generic one for both factions that is open to anyone, but most people do not join these. If you know the guild you are looking for you can type in their name and it should come up on the list. You can do a far broader search to find one to join if you don’t want to remain solo in the game and did not come to the game due to friends. Of course, there is nothing like talking to people and finding a group to play with as you meet people that help with rifts and other things in the game.
Help Tips
When playing a new character these will pop up all the time as you play. It appears as a question mark in a golden circle in the center above your action bar. Clicking on this will open a window with the information it wants to share. You can also find the tips in the Help Tip Encyclopedia, which can be chosen from the menu that opens by clicking on the ‘?’ icon on the bottom left of the screen. You can also search for issues, get unstuck, supply feedback and find a GM with this menu.
An example of one that came up for me early on was that not all quests send you back to an NPC to gain your reward and work a lot like a rift for the reward claiming. You have to click on the bag in the icon just below the minimap. Due to the rifts and some quests like this, definitely get used to noticing what is below your minimap and above your quest list. It can be moved with the edit layout I explained near the beginning if you know of a better place for this to show up, though the default spot has always worked for me.
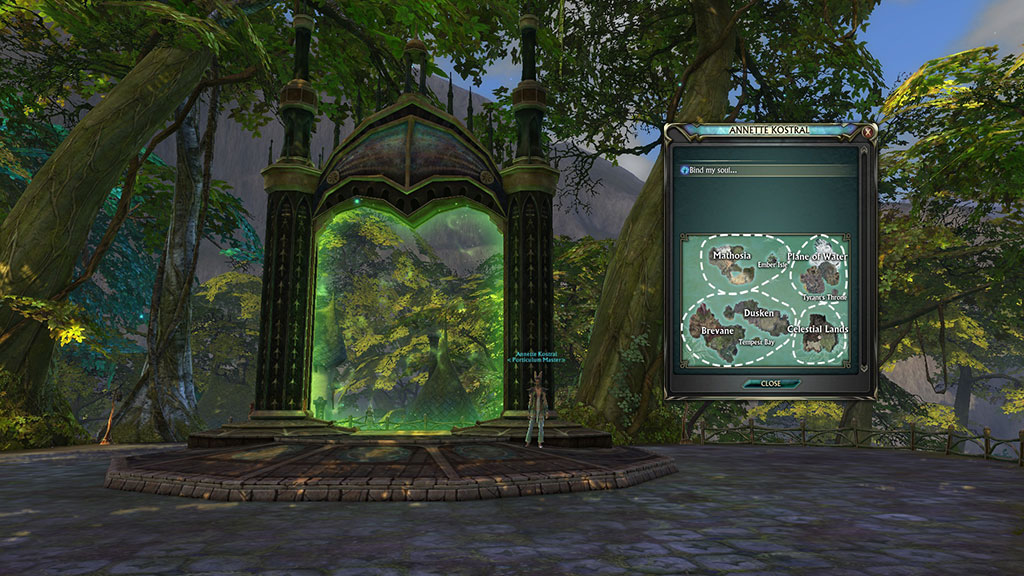
Soul Binding and Porticulum
Porticulum are the gates that let you move faster across the world. You can bind your soul to any of these based on what you want to do. One of the good places to bind your soul is your home city for quick travel back there. Each porticulum has a person managing it and you have to talk to them in order to bind your soul. This is another thing you will learn about through questing when you come upon the first one outside the little tutorial area where you start.
To travel to another location, you must have already been there in your exploration of the world. Right click on the Porticulum Master and then left click on the Mathosia section of the map in the window. A map will appear with all the known porticulum your character knows pinpointed with a bright green diamond in a black circle. Hovering you mouse over the diamonds will tell you how much it costs to travel there. Left clicking on a diamond will automatically pay the fee and transport you to the chosen location.
Conclusion
This took a lot more to sum up than I anticipated and I know I did not touch on everything. However, I hope some of the information helped you further understand the game and will lead you to dig deeper. I truly hope you enjoy the game. I know I have in the little time I’ve been back, and most of that was to figure out this guide.
About the Author

Briseadh
Senior Editor
Althea joined Gaiscioch back in October of 2009 and has been here ever since with only a few month hiatus between Warhammer and Rift. As soon as she knew they were in Rift, she jumped ship to Faeblight and has followed them onward through every chapter since with a few side games thrown in for spice.
She has been an avid player of RPG style games since 1980 when she first played Dungeons and Dragons. Since then she has created her own tabletop gaming world used with various rule sets as D&D progressed. Once she could get online she played MUDs. Her MMO days started with Everquest and have moved through over a dozen games with some lasting only a month's time in her life and others going for years. She has tested several games from the perspective of a disabled gamer with hand issues due to her multiple sclerosis.
When not writing about or playing games, she can be found writing novels, reading and doing various art projects. She also writes items based on her faith and is working on publishing a novel. She also does editing for a gaming developer.