
The Essential New Players Guide to Guild Wars 2
Guild Wars 2 is a game that has continued to draw in new players, causing a friend and I to discuss the feasibility of making a new player guide, despite the game closing in on its sixth birthday this August. In order to confirm things for the free-to-play option, I setup a second account. It proved interesting as I figured out how the restrictions worked for first character on an account and how the game opens up for the free-to-play player. I also had no lack of others in the starter area of the game that appeared to be both seasoned and new players, in part due to this project starting on Memorial Day Weekend for the US.
The best thing I like about how they did this free-to-play setup is that you get to learn the game as you go and decide if you like it well enough to have the full version. If you decide to buy the game I suggest buying a bundle package with the Heart of Thorns (HoT) and the Path of Fire (PoF) included. Packages with gems can save you money, since the 4000 gems alone would be a 50 dollar value. Watch for deals listed by ArenaNet on their site, twitter and facebook.
There is a lot to explain for this game and I set it up to flow with how you are introduced to the game with further explanations later on. The following is the table of contents:
- Initial Setup
- Character Creation
- Your First Story Instance Experience
- Settings and UI
- Communicating and Grouping with Others
- Combat and Equipment Upgrading
- Inventory Management
- Currencies
- Achievements
- Fashion Wars and Other Fun Things
- Higher Level Unlocks
Initial Setup
Once the game has finished downloading and installing, the first thing you will encounter upon logging in is the choosing of a server. If you have an idea beforehand of where you want to play you can sort the server list in alphabetical order by clicking on the word ‘Name’ in the list header. I did this because I wanted to make sure my free account was on the same server as my other account. If you are not sure of where to go and won’t be playing with friends until you find some in game, you can pick any server. However, NA servers cannot play with EU servers. In the PvE realm all NA servers or all EU servers get meshed together like a mega server with map instances occurring based on population. At this time, the server chosen will only impact where you wind up in the pairings for WvW (World vs. World).
Character Creation
Next is the character creation phase, which is ten steps that you can move back and forth through to check things with the ‘Back’ and ‘Next’ buttons at the bottom of the page. There is an option to skip to the end to randomly produce a character, but if you are serious about trying the game I would suggest making it your way. Also, several of the steps will impact the story side of things and some of your choices in the open world. You have two character slots on a free account and it will increase to five with a paid account.
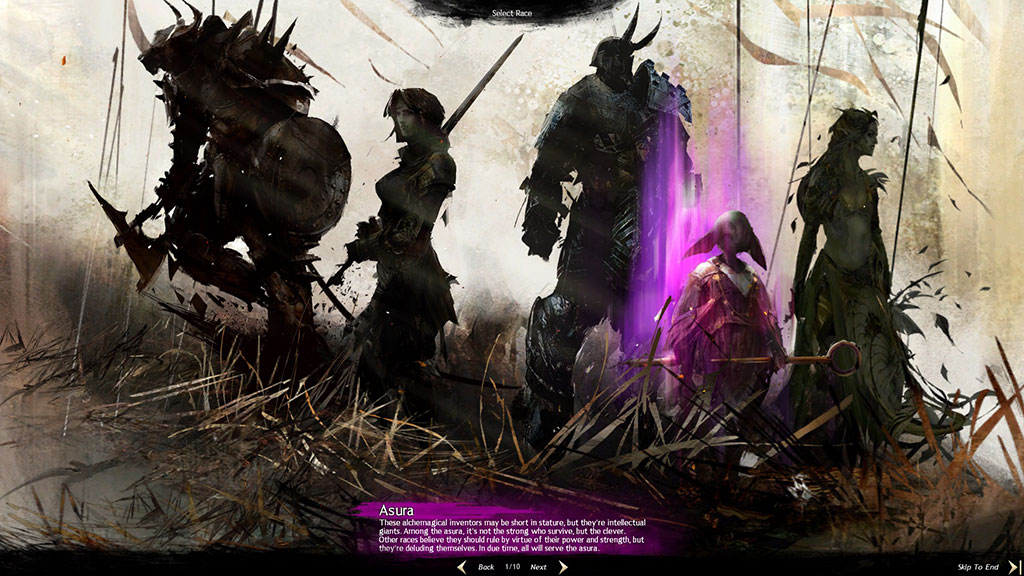
First you will select the race. To see information of each race at the bottom of the screen, click on the picture of it. It will be highlighted and the race name will appear along with the information. The races are as follows, with my own short description:
- Charr - a war based race that looks like a cat with horns and organizes in warbands
- Human - as always the generic race that believes in a pantheon of gods. They are ruled by a queen.
- Norn - a large race that looks human but runs on a clan system and believes in the spirits of the wild.
- Asura - a short race with large heads and ears who believe in the Eternal Alchemy to produce their own form of magic and technology combined.
- Sylvari - A plant race that believe that they are part of a dream with a given mission for their life with the Pale Tree as their leader.
Click ‘next’ when you have the race of choice highlighted.
The second step is a simple gender pick by clicking on the female or the male in the picture. Once the correct one is highlighted, click ‘next’.
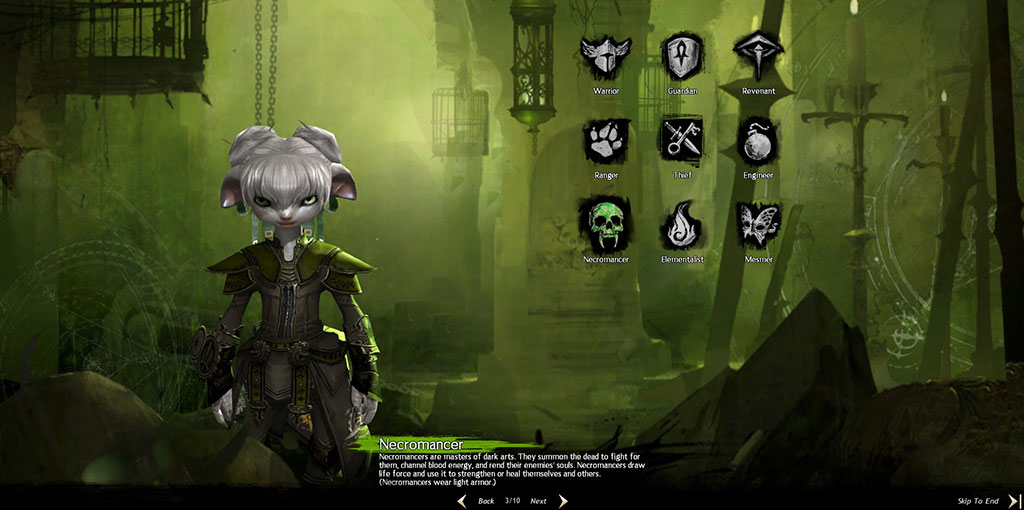
Third is the picking of a class, which there are nine of. All of them will have a brief description at the bottom of the screen after you click on the related picture to highlight it. The classes are as follows with my own description:
- Warrior - a melee fighter that can also use a bow for ranged attacks
- Guardian - this heavy armored fighter has great skills to help with both offense and defense in a group.
- Revenant - a heavy armored fighter with a lot of ranged and AoE abilities that are both supportive and damaging.
- Ranger - a primarily ranged class like most games and has the ability to tame pets that help in combat
- Thief - this class is set to be the sneaky damage dealer and can even move groups invisibly past enemy forces.
- Engineer - the user of bombs, turrets, grenades and other fun gadgets for good damage dealing but also healing support.
- Necromancer - a user of death magic which can call forth minions to help in fights.
- Elementalist - the true glass cannon of the game that can destroy things quickly with the elements - fire, water, earth and air.
- Mesmer - this support class can call on illusions to help it.
All classes get some healing abilities, whether for themselves only or to help a party. Also, there are enough options that you can alter how each class works. One reason to acquire the expansions, if you like the game well enough, is to further options for specialization. Many people suggest trying the Ranger or the Necromancer first to get the feel of the game with a character that has a better chance of surviving in solo scenarios. However, all of them are fun to play and I’ve soloed some tough content with a glass cannon elementalist setup, though it led to some interesting deaths.
Once you have selected the class you want, click ‘next’.
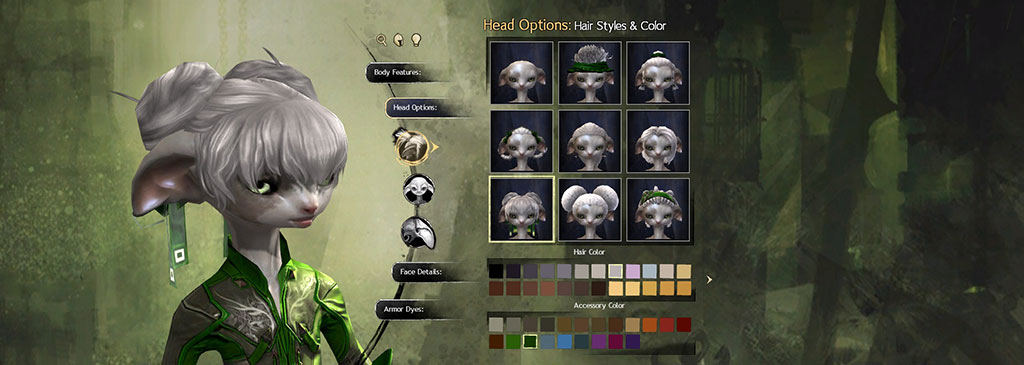
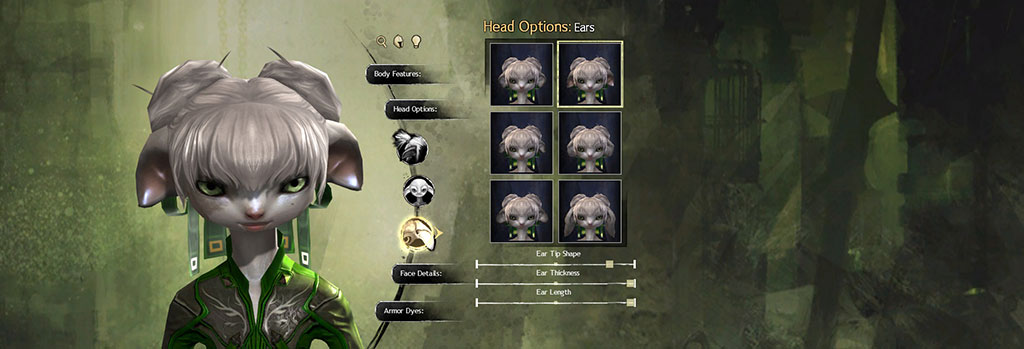
The fourth page of this process is the lengthiest because this is where you can make the character look the way you want. The two screenshots above give examples of what the screens may look like. On the left you will click which option you want to work with and on the right it will change to give you pictures, slide bars, and colors to work with. Your character is always in full view as you change things and you can spin them around to see how they look. You can even check them out with night lighting versus day with a lighting option on the upper left (lightbulb icon) to toggle it. Another option is with and without armor since you can make skin markings and colorings that will show where your armor might not cover. Take your time with this an enjoy playing with it. Once satisfied, click on ‘next’.
The next four pages will set up how your personal story in the game will flow. Like most pages, the choice highlighted will include information about it at the bottom of the screen. The following are what you will get to work with:
- Three choices of how you view your class. On some classes it adds a specific look to the character if you want it turned on (usually the head slot).
- Three choices of how you handle life: charm, dignity or ferocity.
- Three choices of your station with your race.
- A choice of a mentor that helped you get to where you are at the start of the story.
On each page, once you have your selection highlighted, click ‘next’ to move to the next page.
The tenth and final page is a summary of your character and here you can enter a name. It will tell you if the name is allowable and available to be used.
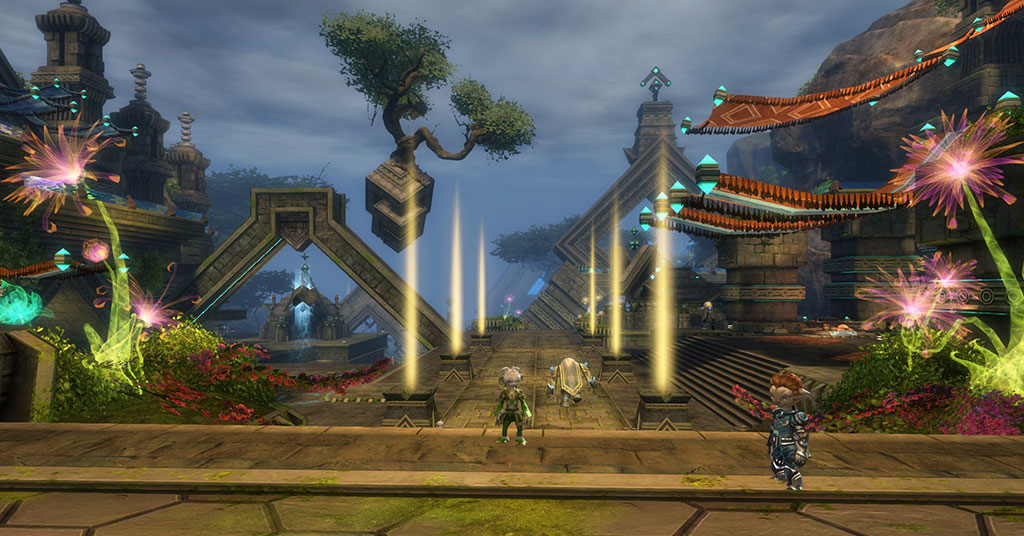
Once you accept this character setup there is no going back except to delete it. You will be put into a cutscene that summarizes your story and then you will appear in the world in the first story instance you will encounter in the game. At this point other players are here so you may not have to do it alone depending on the day and time you create your character.
Your First Story Instance Experience
This first story instance is also a tutorial that will complete your first level of experience in the game. You will have some helpful tips pop up that give you information on how to move in the game and other basics. You will also be introduced to the story journal of the game.
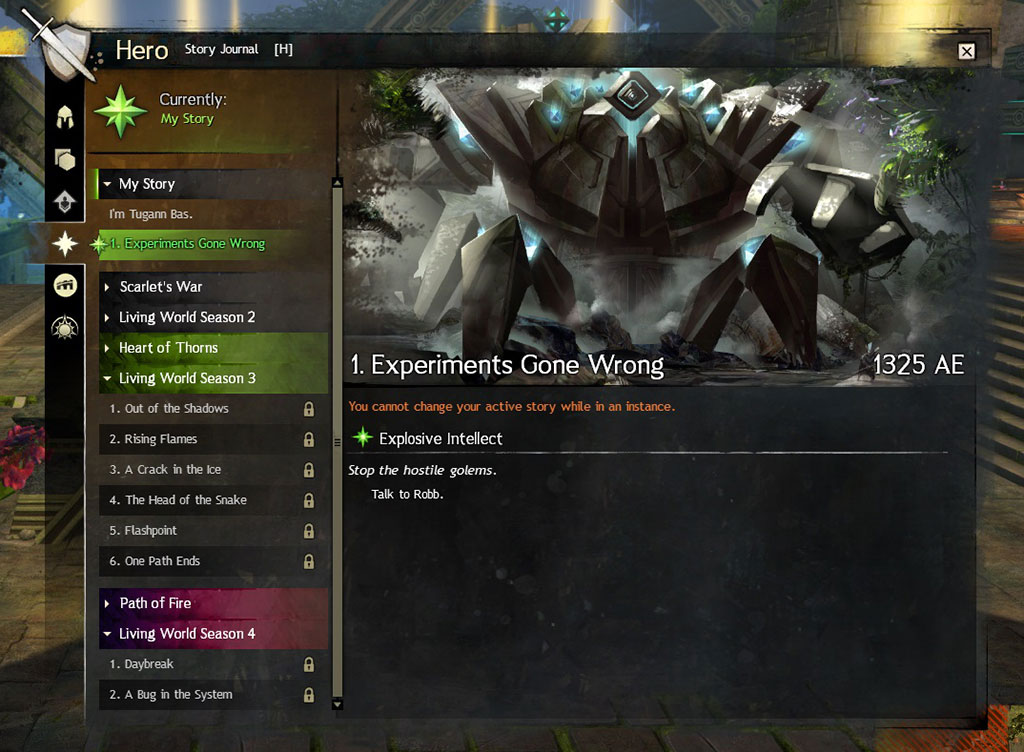
A screen will pop up introducing you to the story. Accept to view the story in your journal and you should have a window much like the one above. To return to the journal at any time in the game, Press ‘H’ and then click on the star icon, fourth down on the left.
On the left of the story journal you will see a list of all the stories available. On a free account, you only have access to ‘My Story’. You may have noticed the game told you what living season story was available. The game notes if you played during any living season chapter, but any that came before have to be unlocked with gems - 200 gems per chapter unless there is a bundle sale. All will show locked and will tell you the expansion you need (if required) and the gem cost if you click on them.
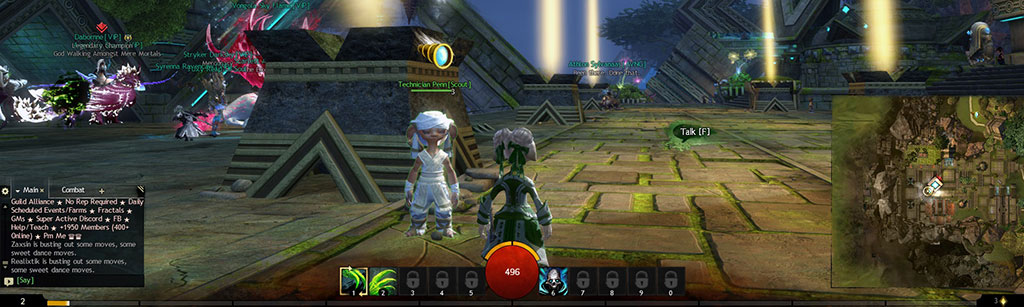
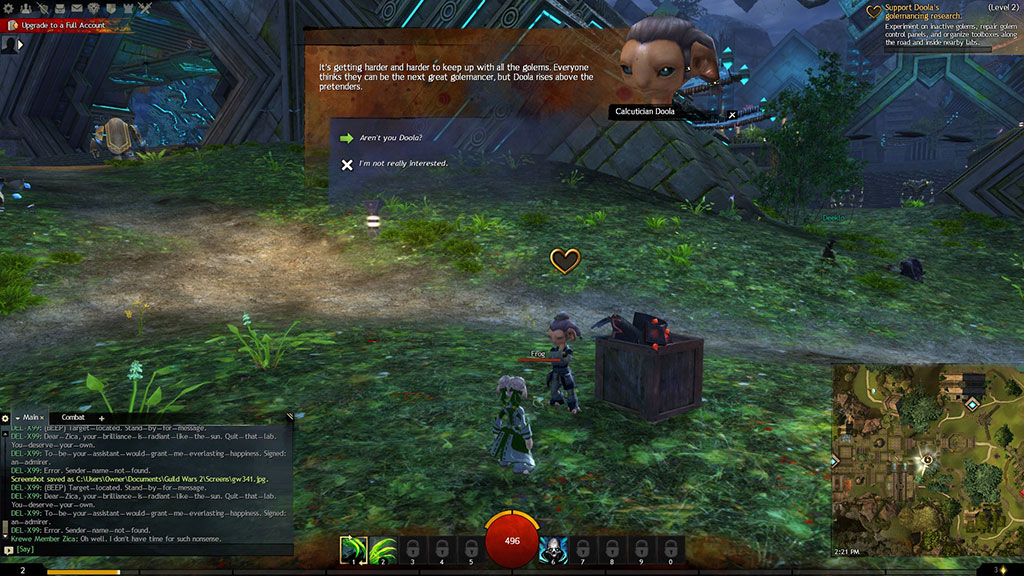
The main part of the window will give you a little detail of the story you are working on now, which is marked in the list on the left with the green star beside it. For an Asuran, the first story will be Experiments Gone Wrong. The information of what to do next will also appear in the upper right hand corner of your window. In my character’s instance I must go talk to Robb.
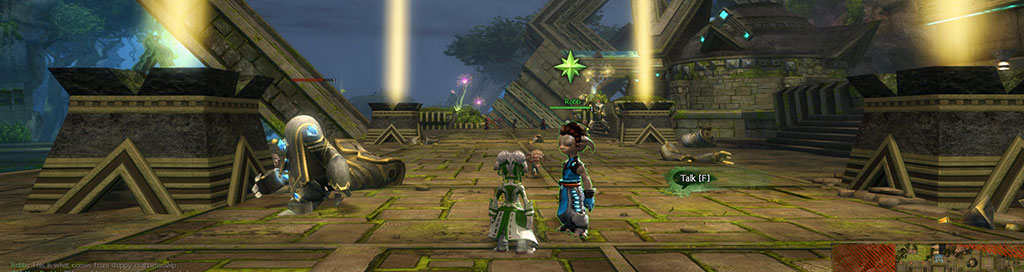
It is not hard to find Robb. For one, he is not far from where you appear here and two he has a big green star over his head. His location is also marked on the mini map on the bottom right of your screen with the a green star. Any active story will have green indicators of where you will need to go next to continue as a star if on the same map or a swirl if you need to move through to another map at a gateway.
When close enough a Talk [F] will show up next to Robb. You can press ‘F’ or click on the highlighted Talk [F]. A dialog box will open up with what Robb says at the top and text lines below of what you can say. In the tutorial you will mostly have only one choice for your reply, but you do have to click on the line to continue the conversation. Definitely read everything that comes up as interactive dialog boxes because the choice you make can even mean failure if you answer wrong, especially on the quizzes in the game.
During stories there may also be cutscenes to watch to help advance the story. There is an option to skip most of these in the bottom right hand corner of the screen, but I suggest watching them at least the first time on any new story you do so you have all the details.
Another quick note is that any story instance you go into you will be alone, unless you make a party of up to five to take with you. Only in this first story and tutorial instance will you see other people without making a party.

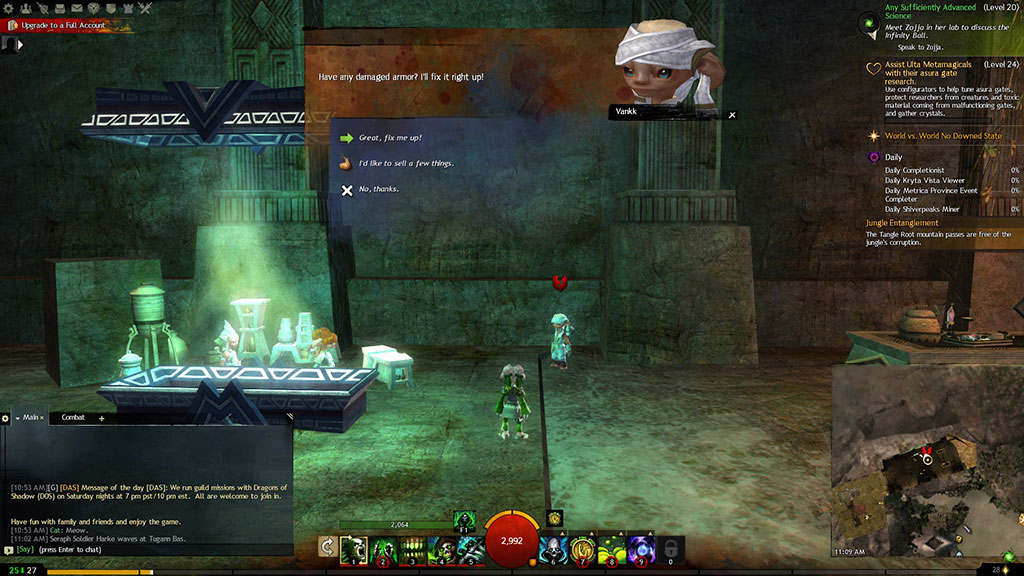
I finally got to fight something. You will have at least some simple armor and one weapon to start the game with. The command bar at the bottom only has 10 slots and as you can tell I only have one skill on the left and one on the right. Let me give you a quick explanation of these slots.
1-5 are your weapon skills. There are choices of two handed, primary hand and off hand weapons, and of course a shield for off hand, too. If dual wielding or a weapon with a shield you will have 1-3 for the main hand and 4-5 will be for the off hand. At level 10, most classes will allow for a weapon swap ability, so you can have two sets equipped at once to swap during combat. At any time out of combat, if you have other equippable weapons in your inventory, you can change out weapons if you have upgrades or want to try something different.
6 is for your healing ability. All classes have some form of self and group healing skills so the standard of tank - dps - healer does not apply in this game like others. However, you can make characters that are more geared to healing than others for group play if you so desire.
7-9 will be class skills which will open up later in the game and you will be able to swap these any time you are not in combat.
0 is an elite skill. There are some that are based on your race and the rest will be based on your class. This can also be swapped any time you are not in combat.
The other important thing to watch on the command bar is the red circle in the middle. This is your health and when it shows empty you are in a downed state that you have a chance of reviving from.
The yellow arc above the red circle is your endurance, which will be needed when you learn to dodge. Default settings are to double tap the direction key you want to dodge in or you can press ‘V’.
I know that was a lot to tell you when all you can do is 1 and 6 at the moment, but each will be explained further as they are opened up for your use. Most unlocking of skills and other things in the game will come when you reach a certain level.
How do I hit this big thing? This game uses ‘Tab’ targeting like a lot of games, but you can press ‘1’ to start your auto attack letting it pick the mob to hit. You can also left click on things to target them. You will see a health bar at the top of the screen that tells you the mob name and how much health they have left. It will turn from red to black from right to left as the mob dies. In my case, as I ran in he was half dead due to the others fighting him. As I mentioned, you are not alone in this first story and tutorial instance.

Once your story is completed you will be popped out of the instance into the full world and will have a large completion notice in the middle of your screen. Click the accept to take your rewards. My reward was a better axe than I had, besides some experience points (XP) and 72 copper.
Money is copper, silver and gold in this game. 100 copper make a silver and 100 silver make a gold. It all automatically converts in your wallet so you won’t be running around with more than 99 copper or silver each. Only the gold will go above 99 as you accumulate your wealth.

I did say you would be level 2 at the end of the story. The experience bar is at the very bottom of the screen. It fills up with yellow from left to right as you gain experience. You will also get a wiggling icon over your mini map and it will open a window showing the level rewards. After accepting, it will look similar to the one in the picture above telling you what levels things can unlock. Always click on the wiggly chests and icons that will pop up over your mini map. There can be more than one there and they will not disappear, so you have time to finish fights before clicking on them.
And look, I now have a second weapon skill on my command bar.
All further personal stories will open up every 10 levels. Each part of the personal story for a level will be a chain of several things you will do. As noted, the map will tell you how to get there with green markers. For a story instance, it will be a floating star that will ask you if you want to enter the instance when you get close enough. The higher level the story, the further you will travel across the world. I suggest doing these when they become available due to the rewards you get, besides the fun of doing the story.
At any time you need a break or you run out of time, you can log out and the character will be left in the world exactly where you left them. If you are in a story instance and you log out you can lose progress, but if you have to, it will leave you in the world near the access point to the story.
To log out, hit escape. You can pick either logout or exit to desktop. If you chose logout, a window will appear with two options: logout (goes back to the launcher screen) and character select for the character select screen. The exit to desktop is a fast close if you are done playing entirely.
Settings and UI
Everything on the UI will stay where it is at in this game but you can adjust your chat window and your mini map. Both can be resized with a drag marker triangle which is in the upper right on the chat window and upper left on the minimap. You can also toggle the chat window to fade out when you are not using it, with only a few lines popping up at the bottom of it as new chat occurs, but it is pretty much invisible otherwise. The toggle button is a little box with a pointer in it at the bottom left of the chat window.
You can hide the UI with Shift+Ctrl+H which makes it nice for screenshots if you are not wanting the UI. Print Screen will take the screenshot and a notice will show up in chat that it was saved with its file name. GW2 makes a folder in your documents folder and inside that is a Screens folder where all of your screenshots will be stored.
At the top left of your screen are several icons. The gear will open the settings window. Click on options to open the window where you can adjust general options, video, voice and key binds.
I have a few suggestions that will help you in the future in the general settings, which is what shows up first and is linked to the wrench icon at the top of the icon menu on the left of the settings window. Most of the boxes will be unchecked on this page, but I suggest at least turning on the following by clicking the box. Be sure a check mark appears in the box in front of it.
- AoE loot on interact - loots everything close to you.
- Autoloot - this will not function fully until you have a paid account and can do what is required to maximize its use. However, turning it on now means you don’t have to worry about it later.
- Show all usable object names - anything you can interact with will have a yellow name making it much easier to see as you explore the world.
- Show skill recharge - a lot of skills have a recharge time and this puts the countdown right over the skill on your command bar. It helps to keep you from mashing buttons that won’t do anything.
Two of these deal with looting. For now get used to pressing ‘F’ to loot all the mobs and making sure you double check. Anything that has loot on it for you will sparkle a little. I actually had to remind myself of this since my full account has autoloot until my inventory gets full. Everything you loot will show up as an icon on the far right hand edge of the screen for a few seconds.
While still on this same settings page you can adjust how your camera works. The default is good for most, but you can adjust the speed of it and how it works to match your needs. I know some people who get motion sickness easy and have definitely adjusted some things here until it worked best for them.
The main thing in Combat Movement is the double tap to evade that defaults to on. This means if you double tap ‘W’ you will dodge forward and the same for any of the other directional movement keys. Some people like to turn this off and use only the key bind option, default is ‘V’, so they don’t accidentally dodge when moving around a lot in a fight or in jumping puzzles. Your dodge is based on the endurance you have, which is the yellow arc over your red health circle on the command bar. Most characters can dodge twice, some can go three times before they need endurance to rebuild, before dodging again.
The second icon of two mountains with a sun is your graphics settings, which will default to what the game detects for your system setup. Most of the time this works out fairly well, but you can tweak things to have better or lower quality. It is suggested if you are in a busier area or anticipating a lot of large fights (especially in WvW) that you lower some of the graphics to reduce lag.
The third icon is a speaker and here you can decide the volume for all sorts of game sounds, so that the music and fighting come out the way you like.
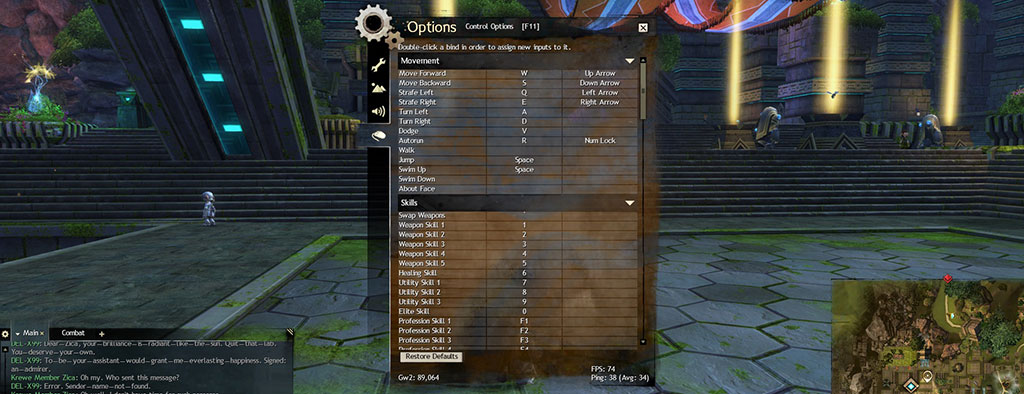
The final icon of a mouse is your keybind setup. There are a LOT of them here, so double check what a letter is used for before you decide to use it elsewhere. A notice of where it is already bound will occur if you choose something already in use. To change a keybind, double click on the name of what you want to change. A window will pop up. Press the key you would like to use for the keybind and it will show up in the window. Click apply when you are sure you want to make the keybind change.
One of the keybinds I did immediately was make ‘A’ and ‘D’ strafe instead of turning. Strafe left and right defaults to ‘Q’ and ‘E’, so I unbound turning and then changed the strafe location to make sure the key was not trying to do two things at once. In this game I use my mouse for turning.
For those that like to have a roleplay walk option, you have to set it up, as the default is unbound.
I would not change too much until you play the game a bit and see how it feels. However, with the number of things you can change, you should be able to find settings that work best for you. The interesting thing I found is that default works best for me, even with the fact my left hand is disabled. Only thing I changed for sure is A and D to strafe instead of turn. I blame 35 years of trained touch typing for this though I miss keys a lot.
World Exploration
Let’s return to the actual playing of the game, since you are out of the tutorial and have a whole new world to explore. I suggest checking all the nooks and crannies of a map, because you never know what you might find, including mini dungeons and jumping puzzles.
You won’t have access to a city until your first character is level 10.. For an Asura, you will pop out of the tutorial with your back to the gate that lets you into the city. It will have the big red circle with a slash through it over the shimmering portal until you meet the requirements to go there. Most of the city portals are not far from the starting waypoints you will be standing on or near, when coming out of each races starting story and tutorial.
Waypoints are the first things to appear on your map. They are diamond shaped with a light grayish border. The color in the middle will turn from gray to blue when you get close enough to it. The map will give you a hint it is there before you get close, but make sure you run up to it to get your exploration credit for finding it. Any with a blue center are unlocked for use. Any unlocked waypoint can be traveled to from anywhere in the world for a fee. The further you go the more you pay. All characters start with five waypoints open for the starter map of each of the five races.
Press ‘M’ to pull up a large map. You can scroll in and out so you can see anything, from only your immediate area to all of it. Since your character has not gone far, most of it will look like a blotchy mess of color, except for the area around the five starting waypoints I mentioned above. To use a waypoint left click on it and a window will pop up asking if you wish to travel there and what it will cost. If you don’t have enough money, it will not allow you to travel. However, everything is priced so you will probably never have this problem, unless you spend all your money on acquiring things.
There are helpful scouts across the world, several on each map that will tell you about the area and things you can do to help. They show up as a spyglass icon on the map. The scout will have this icon above his head when you get close enough to see him.
You will see the outline of yellow hearts on your map noting the spots the scout told you about. It is worth taking the time to complete the tasks for the hearts, not only for exploration completion, but the experience and rewards you can get. Once a heart is complete the NPC turns into a vendor. You can always find them at the location marked on the map with the heart and they will have the heart icon over their head.
When in the area of a heart you can work on, it will appear in the upper right of your screen with info of what you need to do and a yellow completion bar that fills up as you do the tasks required. The heart icon on the map and the one over the NPC’s head will also fill up. If you hover your mouse over a heart on the map, the percentage left will be shown. This comes in handy as a double check to see if it says complete. All hearts will automatically pop up on the right hand side if you have something still to do there upon returning. You will find that they don’t all have the same area size and the heart NPC is not always in the center of the area.
When a heart is completed you might get a wiggly heart icon over your minimap to click on to obtain its rewards. And at these low levels the closest heart to where you are will be indicated in the upper right and a compass arrow to show you which way to go. Up will indicate it is directly in front of you and down directly behind. If it is pointing left or right you need to turn in the respective direction to get back on track.
The other things to find on maps are Points of Interest(POI), Vistas and Hero Points(HP). None of these show up immediately for a first character, regardless if you are paid or free, as part of the fun of first exploration. However, if you find them you will get credit for them and the game will tell you even if you can’t see it on the map yet. Just run around checking things out as you head from heart to heart and you will definitely find all of these. Vistas and HP’s have an interaction mechanic, but POIs are automatically marked, like Waypoints, as you run close enough to them.
The following is a list with levels of when you can encounter or have them show on the map:
- POI - I acquired notification of finding one at L2 (level 2) and could see them on the map at L4
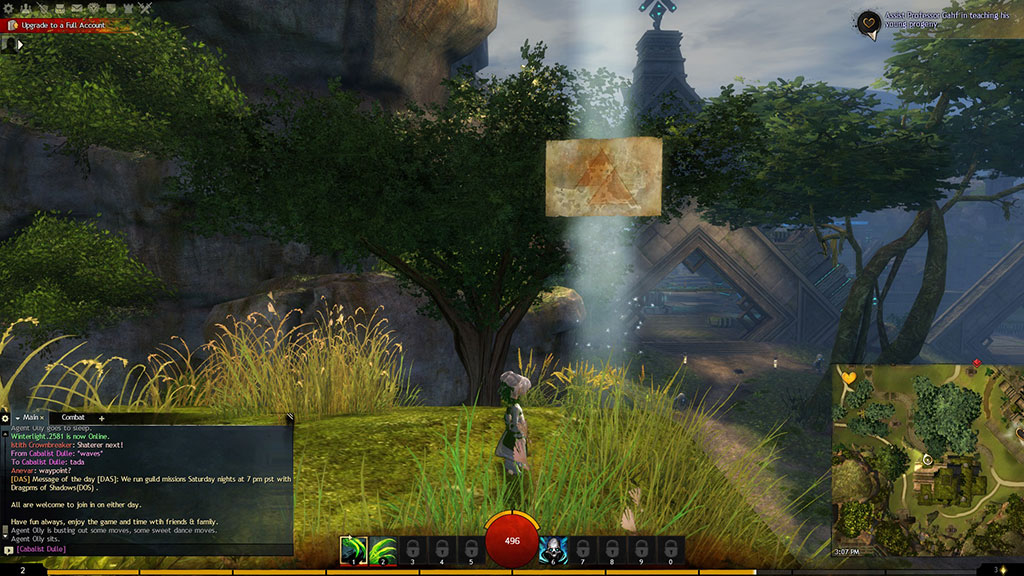
- Vista - You can interact with them if you find them, as a beam of light with a waving map in them and they show up on your map at L5. Oddly the level rewards say these are unlocked at L7.
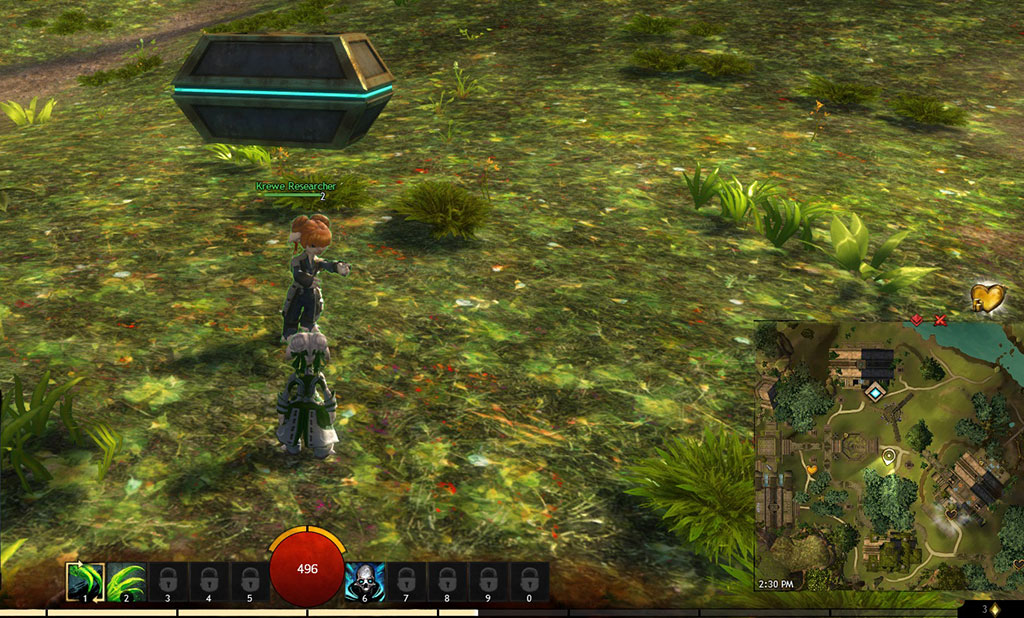
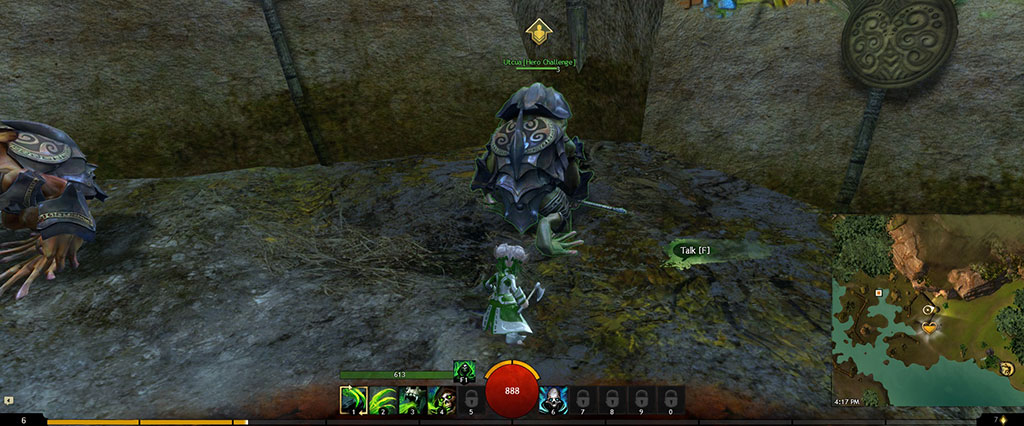
- HP - can be found at any level, but you cannot interact with them or see them on the map until level 11, but if someone starts a fight challenge HP it will give you credit when you join the fight. Communes are a simple interaction that will give you credit if not interrupted. Fights are completed upon you winning the battle. Some will give you an item in your inventory and you must use it for HP completion. The picture below is an example of an NPC for a fight challenge.
The great thing is all of these will be visible and the HPs doable for the second character on an account as soon as they are out of the tutorial, if the access was opened by the first character. This is the case for both paid and free-to-play accounts.
Another thing you will encounter in your exploration are events. They will be marked with a variety of orange icons and possibly an orange circle to note the area where you will find what you need to complete it. These can sometimes help with heart completion and always give some reward. There are some special invasion events that occur in some zones that will have red icons instead of orange to mark them. These are probably the toughest to deal with when they occur, since they are definitely more group oriented than the standard orange ones.
The following is a list of icons you will see for events:
- Fist - a brawl event, includes Hero Points with a fight challenge when the HP is activated.
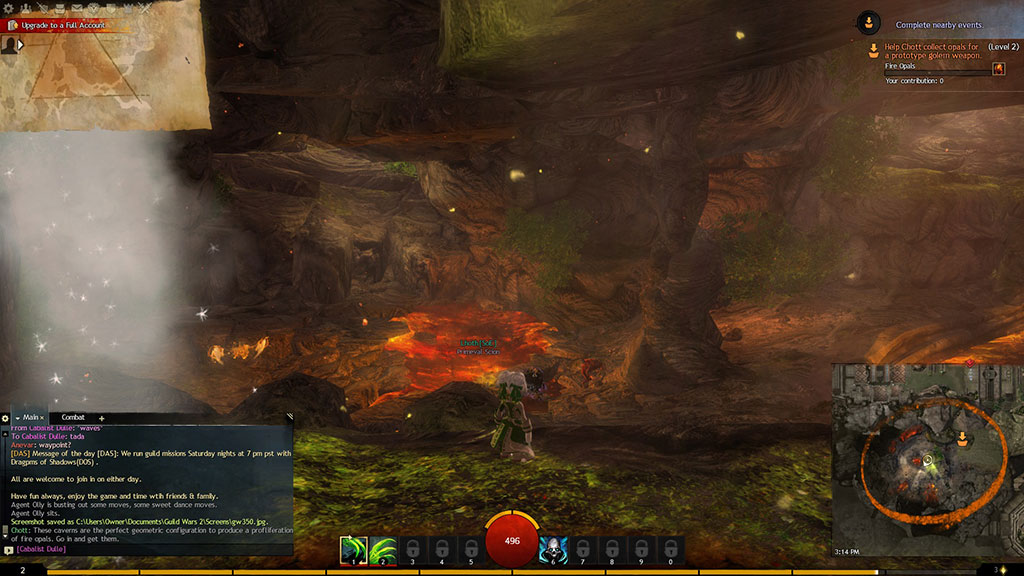
- Bowl with Arrow Pointing into it - gathering - find the item, usually needs multiple, and turn them in to the NPC with the matching icon over his head. There will be a 30 second to 1 minute countdown after he has everything to give everyone a chance to hand in extras for credit. (pictured below the list)
- Horned Head - a higher powered mob to kill
- Crossed Swords - a fight to free the area of some sort of invaders
- Shield - defense - where you help the NPC get something done from a simple escort to building things.
- Orange with a White Asterisk - assist the NPC - the icon will mark where they are on the map. Sometimes this shows up along with a defense to show where you need to go with the NPC.
- Flag - a capture event
- Gear - sabotage event where you have to make sure the enemy does not steal or sabotage the item marked with the icon
Communicating and Grouping With Others
Free or paid, you can join a guild as soon as you are out of the tutorial. This is good especially for those starting out that have friends with a guild to play with. Not all of us have this luxury, but I’m glad you can get in one from the start. MMOs are always more fun with others.
Even if you don’t have a guild to join from the get go or even friends playing, you can still find people to play with. At the beginning zones it might be best to ask if anyone wants a partner or to say something to another player you see. There are multiple ways of doing this, but free accounts do have some restrictions. To chat you need to press enter and a cursor will show up on the entry line at the bottom of the chat window.
The following is a list of chat channels:
/s - a local say function, though the area is pretty large, but is never the whole map. This is the free-to-play character’s chat option.
/m - everyone on the same map can see this. However, a free account will only see, but not be able to talk here.
/p - if invited to a party this is how you talk to the party only - maxes at 5 people
/d - this is for squad chat - you might find yourself in one of these at some point as you level higher - it is a max of 50 people
/g1, /g2 … /g5 - are guild chat and you can be in a total of 5 guilds.
/w - to whisper someone. On a free account you cannot whisper to anyone unless you both add each other as friends first, or you are on the same map. Free accounts can’t use map chat, but if you see someone you want to respond to, right click on their name in the chat box and select Whisper from the menu that pops up. I’ve tested this and had some fun chats with players offering help to new people.
Another way to share and communicate is with the mail system, using the envelope icon in the upper left. Paid accounts will have no issues using this, even as a first character. However, a free account must have both parties as mutual friends, like with whispering, in order to send mail. Also the free account can only send text to other people, but they can receive items and coin via the mail.
To find friends and groups you will click on the two heads in the icon menu in the upper left or press ‘Y’.
The first icon of two heads on the window opens your friends list. This is where you will put in names or user ids to add them to your list. You will need to add people here for free accounts if you intend to mail or whisper them. If you meet people in person you can click on them to target them and then right click on the picture on the bar that appears at the top of the screen. An add to friends option should be in the list as a faster way to friend, than trying to type in their character name.
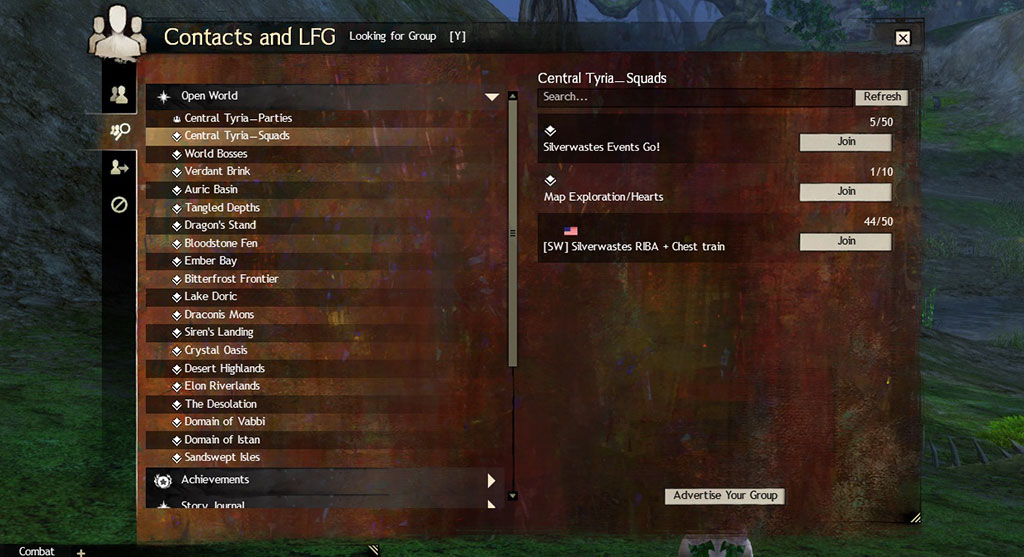
The second icon of the two heads with a magnifying glass will open the Looking For Group (LFG) page. There are a lot of options, but primarily look in open world for Central Tyria and when you have more of the maps open you can try hopping on a World Boss train, if one is running. You can join by clicking on the group name in the list on the right, if there are any at the time you look. There will be one for Silverwastes quite often and this is L80 only content, but it is a fun place to play when you get there.
Combat and Equipment Upgrading
I touched on combat and equipment lightly so far. As mentioned, you gain more skills as you level up and your adventures can help you acquire armor and weapons to upgrade with.
Combat is pretty simple in that you have your 10 main skills that will open up eventually and also some special things that will use the first 5 function keys. You tab target and hit the one key for the first skill, which can be set as an auto attack. It will fire in between any of the other skills you use, as long as you stay on the same targeted mob. A fun thing to do is to press 1 and if an attackable mob is in sight and range it may start auto attacking, saving time on having to hit tab. However, you won’t know what you are really going to hit until you hit it. It is safer to stick to tab targeting until you get used to it.
A lot of the skills will have cooldown timers, this is why I suggested in the settings area to turn on the option to have the countdown show up on the skill. The skill won’t do anything again until the timer is off.
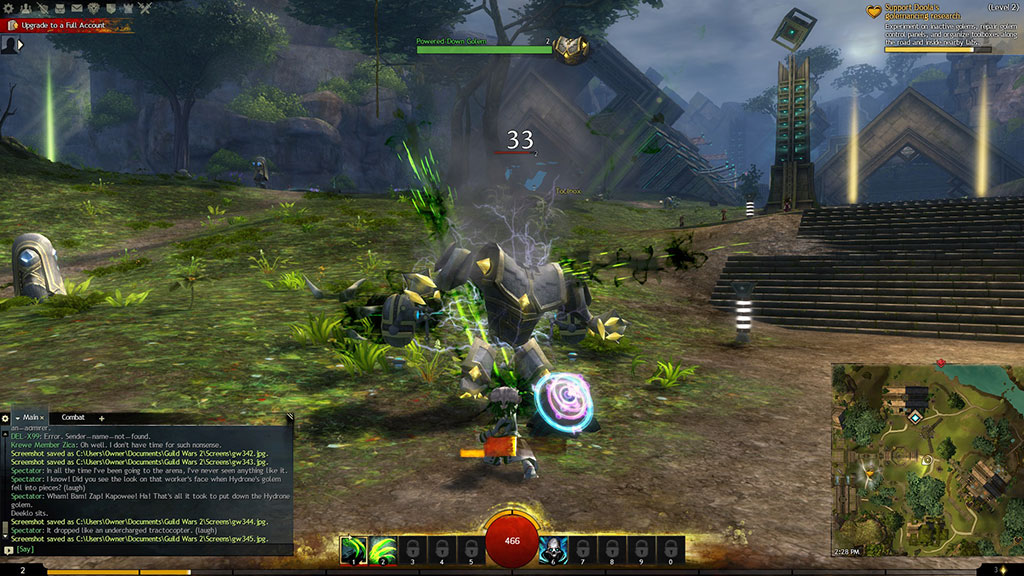
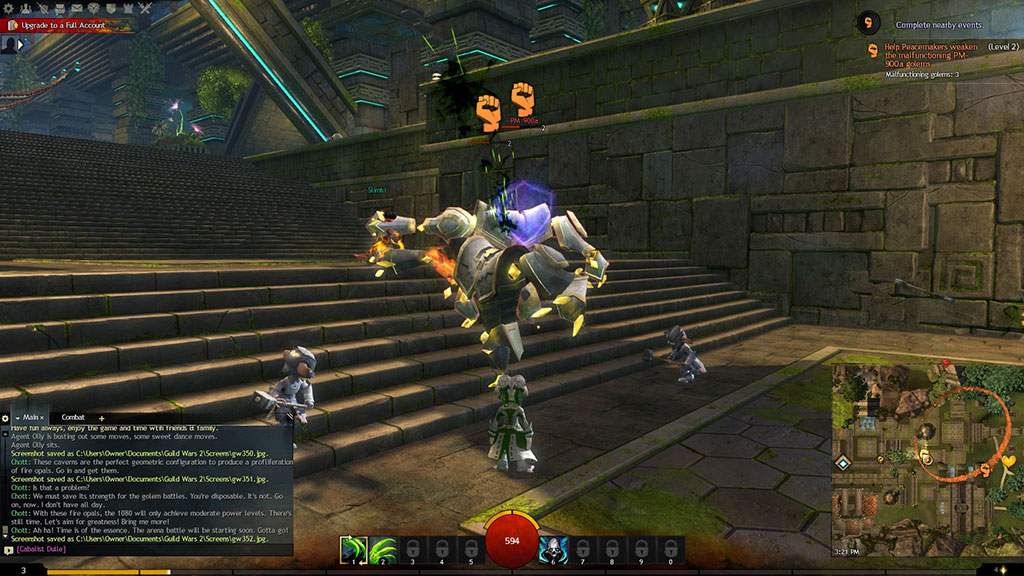
Another thing some skills have is a yellow bar that will pop up in the lower part of the screen above the command bar to show its progression because it is not an instant attack. In the picture it is on top of my character. In most cases you need to let the skill run its course without interruption. This game is not a fast button smashing game if you want to get the most out of your skills.
Aggressive mobs will have a red name and nonaggressive will have a yellow name. Get close enough to one with a red name and it will attack immediately. The nonaggressive will not attack you unless hit. It is good to note what mobs are in the area because the AoE skills may pull in a nonaggressive to a fight if too close to you. This will lead to a more challenging fight and possibly your death, if you are not ready for it. A nonaggressive, once attacked, will turn to red to note it has aggroed against you.
The targeted mob you are fighting will have a health bar above its head. As you hit it the bar will decrease from right to left and you will also see white damage numbers on the screen for all your successful hits. You will also see obstructed if no line of sight and invulnerable if the mob is in a state where it can’t take damage. You will see the latter more in dungeons, fractals and special parts of the story path. Another you will see is evaded when the mob dodges your attack. You can also evade any mob attack by dodging with ‘V’ or double tapping if you left the auto dodge on.
Up through level 9 you will only have your weapon skills, healing skill, and possibly an F1 skill, which will show on the command bar above the weapon skills of 1-5. Hovering your mouse over any of the skills will give you a tool tip about the skill to help you understand what it does for damage and other effects: for example, stunning, crippling, or knocking back your opponent. There are more effects than that based on weapons and class.
You will also have rallying skills if put into a downed state, which will use the 1-4 keys, when you have acquired them all. If you kill a targeted mob before your rally bar empties, you revive. One of the skills will be a slow healing on yourself as long as you are not being hit. Always be sure to have a mob low on health targeted, if you can, when in a downed state so you can do a combo of healing yourself and attacking. You revive if it dies before your downed state timer ends.
Combat skills open as follows:
- Weapon skill one - you start with this
- Weapon skill two - level 2
- Weapon skill three - level 4
- Rally/Downed Skill One - level 5
- F1 Skill - level 5
- Weapon Skill four and off hand weapon - level 6
- Equip Fine Gear (Blue Name) - level 6, but I had a fine axe equipped at L4 if not L3
- Rally/Downed Skill 2 and Armor Repair - level 7
- Underwater Combat - level 8 and you will be rewarded with your first breather and weapon
- Weapon Skill 5 - level 8
- Rally/Downed Skill 3 - Level 9
- Weapon Swap (if class allows) - Level 10. Elementalist is one class without weapon swap due to its added elements in the F1-F4 slots.
Slot 7 on the command bar opens at level 11. This is the first of three slots that are associated with the HP you can gain. Be sure to go underwater the next chance you have after these start opening so you can also apply them there. Underwater combat handles these differently. If you go into PvP and WvW you will have to make sure these are set properly.
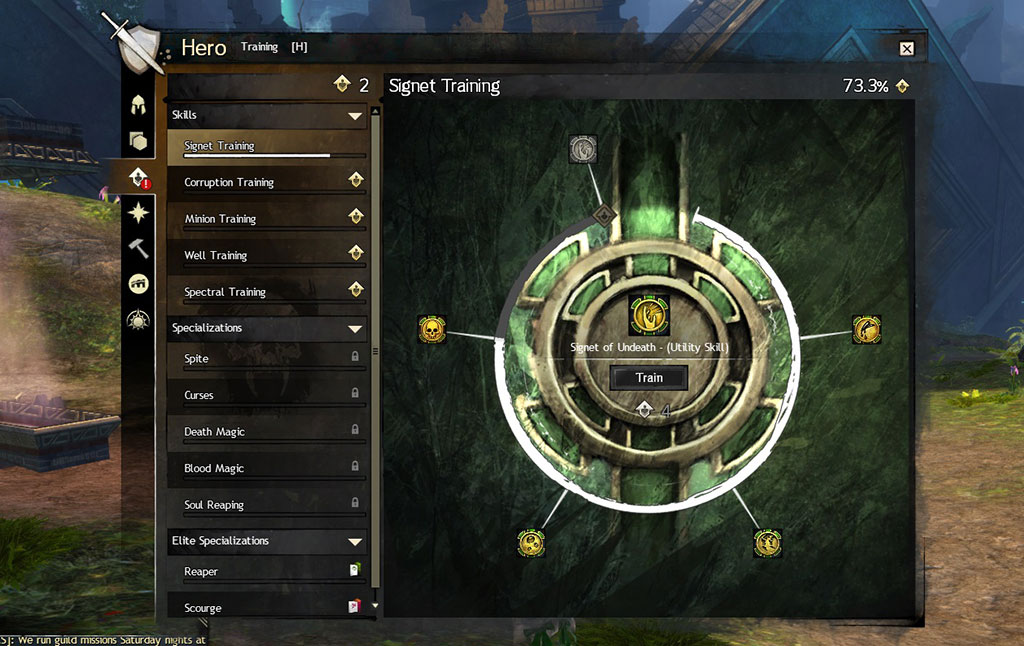
Whenever you have HP to spend, the Sword and Shield icon in the upper left will have a red circle with an explanation point in it. Click on the icon or press ‘H’ to open your hero panel. You will see the third icon in the left hand menu looks like an HP marker on the map and it also has the red circle with the explanation point. Click on it to open the window where you can train for skills. You will see a list on the left and all with the HP icon after the name are available for you to put points into. A circle with icons will show on the right for what is selected on the left. I suggest taking some time to read the tooltips by hovering over the icons around the circle to see what you would like to learn first. You must go around each training circle in order, so if you really want the last item, you must first acquire all the others. Be sure to complete all the Hero Challenges you find and you won’t have a problem with the training. The fun part is deciding which three skills to use in slots 7-9 when you have all of them trained and how to swap them between fights, if you know what to expect next. There are plenty of sites out there to help with builds, just make sure you are looking at ones that are updated.
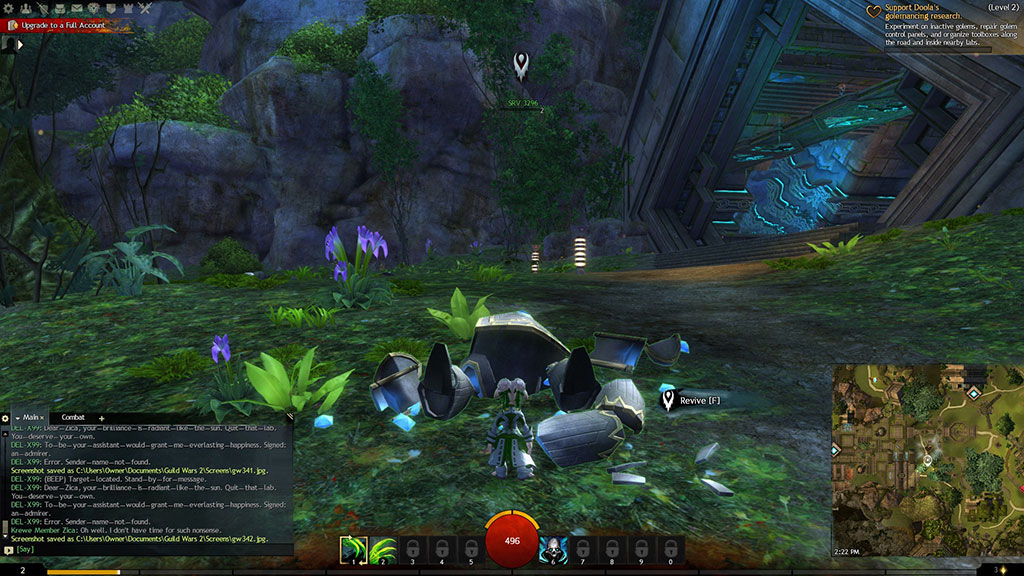
You will be able to revive fallen players and NPCs. The order you should do reviving in for the most efficiency is downed player, who you will see sitting down with an outstretched arm trying to rally, the fully dead in prone position player, and then the NPCs. Players will have blue names and NPCs have green names. Sometimes it is hard to target a player first when by a downed NPC, so be sure of who you have targeted before hitting ‘F’ to revive.
To check out your character’s attributes and armor you will use the Hero Panel, which is reached by pressing ‘H’ or clicking the Sword and Shield icon, third from the left in the upper left hand corner of your screen. If it does not automatically open to the first tab for Equipment, click on the Helm at the top on the left.
You will see a list with Equipment at the top, click on that. When it opens you will see any equipable items you have in the boxes on the left. On the right, you will see a picture of your character with six boxes for armor to the left of it and your weapon slots below the armor. In my case I’m using two weapons with the first being the main hand and the second, smaller box, being the off hand.
There are three types of armor: light, medium and heavy. What you will be able to wear is based on your class. A note in red appears on item tooltips if your character cannot use it. Be sure to read them to verify what is restricting your character from using it before salvaging or selling it.
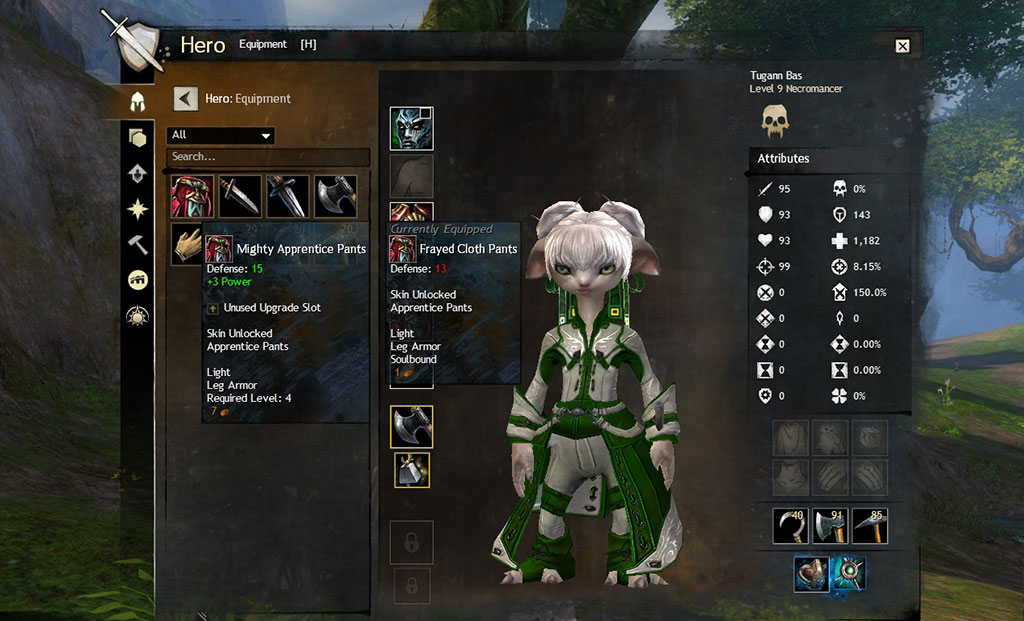
If you hover over any of the items in your inventory on the left, it will pull up tooltips for it and the item you have equipped in the corresponding slot. If there is nothing to compare it to, then the slot is empty and you should equip this item. If the stats of the currently equipped are less than the item in the inventory, you want to equip the inventory item by double clicking it or dragging it over the corresponding armor or weapon slot. I suggest dragging for weapons and later on for jewelry because sometimes it might not go in the slot you expected it to. Some weapons can go in either hand and some of the jewelry has two slots and double clicking will always replace the first slot.
As you level up, gear will start dropping with upgrade slots and you may acquire some runes or sigils as loot and more often from salvaging gear you can’t use. Using these in upgrade slots helps improve your armor and weapons. Runes are for armor and sigils for weapons. In your Equipment window on the Hero Panel you will see them as usable items on the left. To apply a rune to an item, right click it and then left click the item to apply the upgrade to. A box will pop up for you to confirm the decision. If an upgrade already exists on the piece of equipment, the new upgrade will override it if you confirm to apply it. Be sure you are applying it to the correct piece of armor and that you do want the new upgrade verses the old. If you get into crafting later on, the recipes are insignias for armor upgrades and inscriptions for weapon upgrades.
Each quality of gear has a color associated to it and its name will be written in that color. From lowest to highest quality the colors are:
- White - common
- Blue - fine
- Green - uncommon
- Yellow - rare - L39 is when you can start using them
- Orange - exotic - found around L70ish and most crafted are L80
- Pink - Ascended - L80 high end crafted gear requiring maximum crafting levels. Some can be acquired by looting mobs or buying from special vendors. All of it is account bound so cannot be given to other players, but is swappable between all characters on your account if they can equip it for their class.
- Legendary - Purple - crafted gear requiring collections and maximum crafting levels. Has the same stats as Ascended but ease of swapping stats and also special effects and graphics.
Don’t fret too much about the armor quality until you are level 80. Just keep checking the gear that you loot for better options. Also check the heart vendors to see what they offer.
Your armor will take damage when you die. You will see an orange shield over it if damaged but still usable. Broken armor is obvious without looking at the Equipment page because it disappears from your character. I had to laugh because when I first played live, I lost my pants due to not double checking my armor enough. On the Equipment page the broken item will have a broken red shield over it . Any vendor or anvil with this red broken shield symbol over it can be used to repair your armor. Keeping your armor in shape will help your character succeed. Only the six armor slots are impacted by damage.
Attributes can be found in two columns on the upper right of the Equipment page. Hovering over any of the icons next to the numbers will pull up a tooltip with a quick explanation. As you level, these will naturally increase. Higher quality and level gear will also increase the stats of your Attributes. Once at level 80 you will want to make sure your attributes are good for the build that you want. Again, I’m not going to talk about builds here since most information is for level 80 and there are plenty of places to find the information.
Inventory Management
The game within the game is what many of us in Gaiscioch like to call this. Some games are less forgiving than others. Guild Wars 2 is one of the better ones, but you will still have to play this game until you can expand to larger bags. You can spend gems to expand how many bag slots a character has and also add vault space to your shared bank. The bank is shared by all characters on the account and it is recommended to expand this first with gems rather than for bag slots that are for one character only.
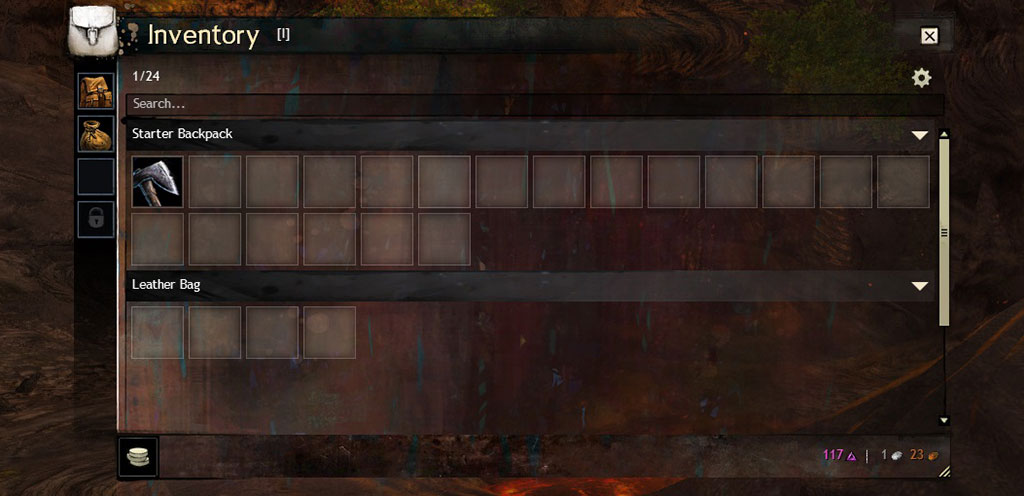
If you press ‘I’ or click on the Bag icon, fourth from the left, in the upper left, it will open your inventory showing your bag slots down the left. Most of the window is all the inventory slots in order of the bags on the left. The first slot will always be a 20 slot starter bag. You will get other small bags as rewards as you play, but for larger bags you must buy them or learn to craft them.
When you get a bag, it first goes into one of your inventory slots on the right. You need to double left click it to equip it and it will go in an empty slot, or you can drag and drop it in the slot you want. If you want to replace an existing bag with a larger one in the future, be sure to empty the bag you want to remove and then you can drag the new one over the slot to swap them.
What do I do with all of this stuff that is not an upgrade for my character to use or is just junk loot?
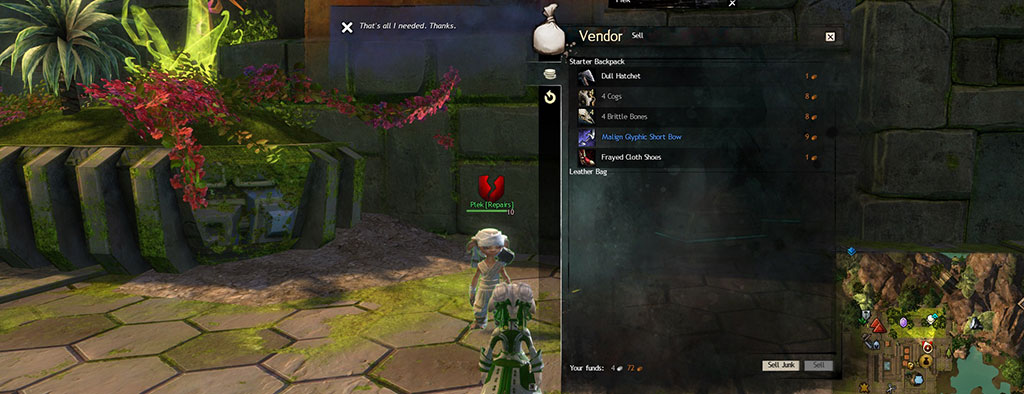
As I mentioned above when completing Hearts the NPC will turn into a vendor when you complete it. Also any NPC with coins over their head will be a merchant and will be marked on the minimap as such. When you first talk to any vendor the window will open to what they have for sale. If you click on the coin icon on the left, which will always be second from the bottom, you will be able to sell items. To quickly clear out junk (gray named) items, click on the Sell Junk button on the bottom right of the window. To sell any other item double click the item in the list to the right.
If you sell something by accident you can click the circling arrow icon at the bottom on the left hand side and buy back the item. Make sure you do this as soon as you realize because sold items can only be bought back for a certain amount of time. The nice thing is the buy back items will show up on all vendors until the timer runs out or you log out. Even returning to the character select screen will remove everything in the buy back tab.

Another useful thing in the game is salvaging. You can buy these kits from any standard merchant and there are a few of them for every map. The merchant in the picture above has two for sale. It is best to buy the second as it is a better and higher level salvaging kit. As you level you will be able to buy and use higher quality kits.
Once you buy the kit it will appear in your inventory. Right click on it for a pop up menu with a list of things you want to do. If you click on ‘Use’ it will highlight non salvageable items with red. The cursor will now have a symbol of two circling arrows that will be green, if you hover over what you can salvage and red if over something you cannot. Left click on an item that can be salvaged and you will acquire some materials that were used to make it.
To salvage faster you can click on salvaging all blues or click on the green to do all green and blue items. In the beginning the all blue and green will include white items too. Yellow for rares is separate and will only do yellow named items. You can salvage orange (exotic) items only with the first option of ‘Use’. When doing the fast option of all of a certain color be sure you don’t have items of that color you were saving, unless they are in an invisible bag, which is a bag that will hide the items from merchants and the salvaging tool. There is no turning back once you salvage.
Most of the salvaged materials can be deposited directly into the crafting materials bank. Click on the little gear icon in the upper right of the Inventory window to open an options menu. The first choice is Deposit All Materials. Click on this choice and all the materials usable for crafting will disappear from your inventory directly to the bank. You will want lots of these materials to help level your crafting and if you decide not to craft, the salvaged materials can sell well on the trading post. However, free accounts cannot sell anything on the trading post, though you can buy some things.
Stackable items will go to 250 for all inventory and bank slots. You can spend gems to up this total to 2000 for the crafting materials bank area with the Storage Expander. If you decide to seriously play the game and get into the crafting, these expanders will prove to be very helpful.
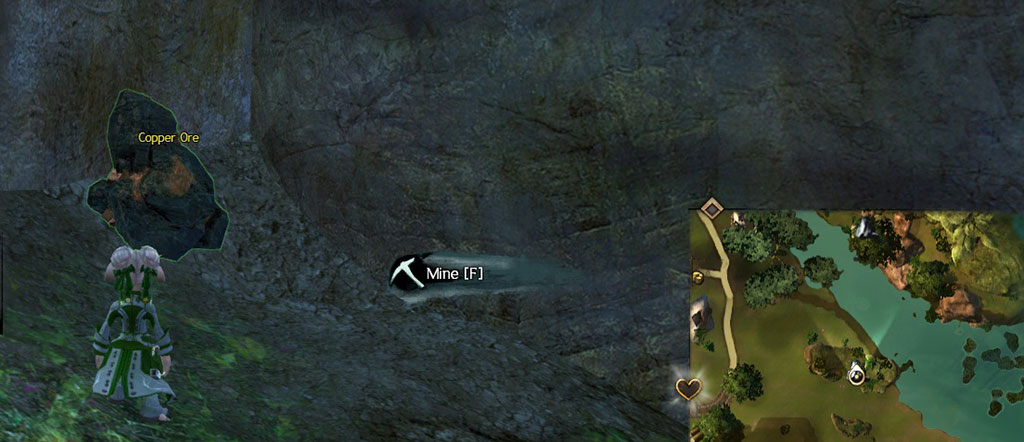
Talking of crafting materials and organizing of inventory, you can fill up your bags with harvested items found around the world. The same merchant that sells the salvaging kits will sell the tools. Again you want to buy the highest ranking ones the vendor has because if you use lower quality tools on higher nodes you will get nothing but junk. Copper will work for most of the first map you will explore, but you will need iron for the next map. You can tell what level the nodes are by hovering over any gray mountain icon on the mini map representing an ore node. The wood and plant nodes will require the same level of tool as what the mining node produces. So if the nodes in an area are still copper, then your copper tools will work on the wood and plants, too.
There are three nodes and each has its own harvesting tool. You will need to be sure you acquire a mining pick, logging axe and harvesting sickle. You equip these as you do armor and weapons. They will show up in the lower right of the Equipment page on the Hero Panel and a number on the stack will tell you how many you have left. You will go through mining and logging tools faster, despite the stack being twice that of the sickle, because ore and mining nodes will use up three tools per node while the plant nodes are one tool per node. If you run out, a message in red lettering will pop up to let you know.
Of course, I talked about the bank already due to the crafting materials you can automatically deposit. All cities have bankers, but first characters on accounts cannot enter the city until they reach level 10. All first area maps for each race have at least one “town” with a banker for this reason.
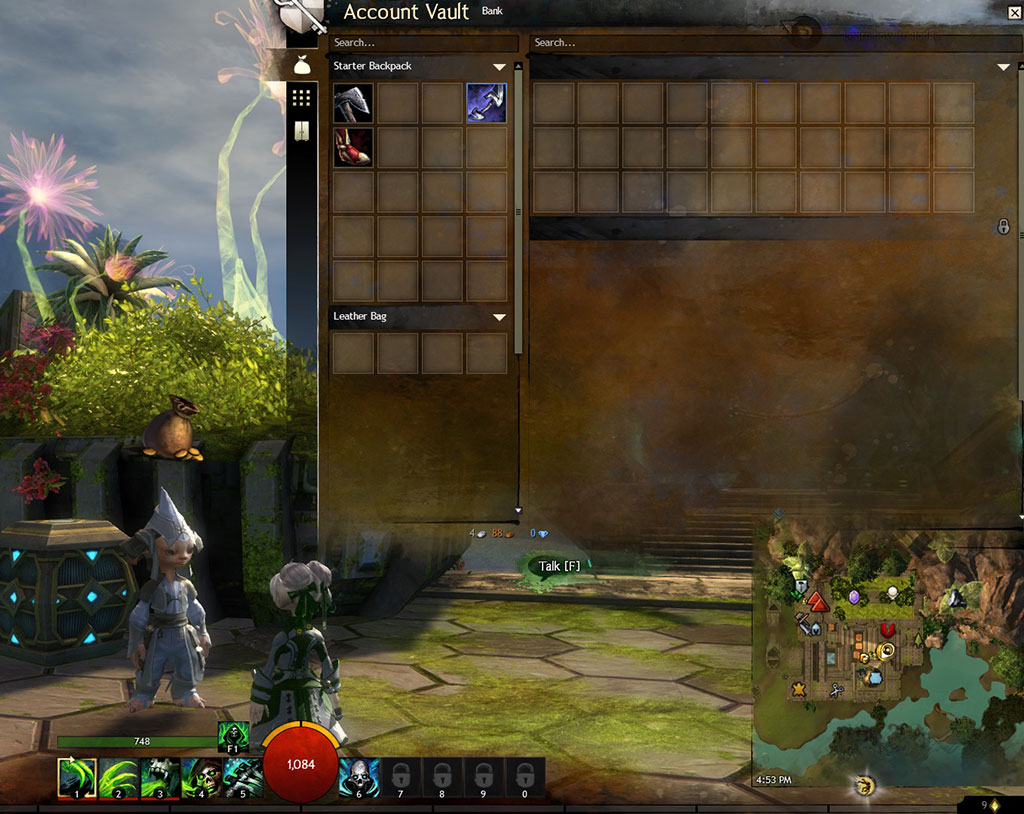
When you start interacting with the banker he will open to your main bank that starts with 30 slots. To move items double click on them and they will go to the first available slot, whether moving from bags to the bank or vice versa. If you want to control what slot it goes to, left click and drag the item. Pressing Alt before dragging a stack of items will pop up a window asking how many you wish to move. It automatically chooses half, but you can change the number by typing it or using the arrows on the right to increase or decrease.
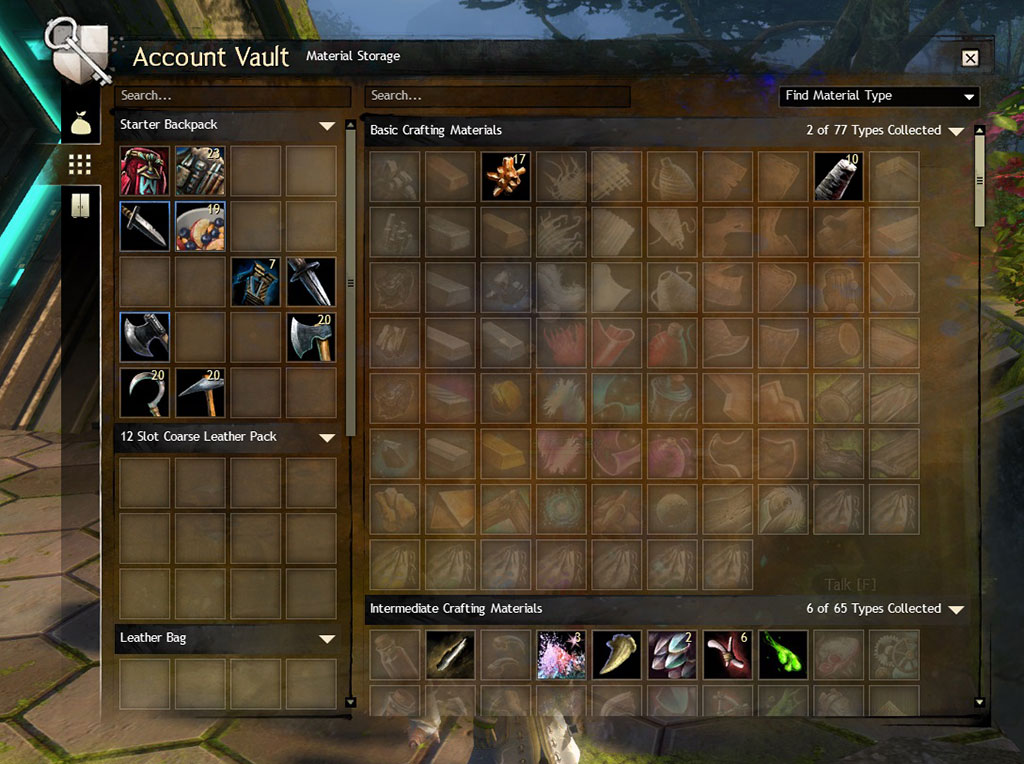
To view the crafting material bank click on the icon of 9 little squares on the left hand side. It scrolls for quite a ways, but like the main bank your bag inventory will be on the left and the bank area on the right. You can see I have some ore and wood I managed to acquire from salvaging and gathering.
Currencies
Guild Wars 2 has a lot of currencies. To see them, click on the coins at the bottom left of the inventory window and to return back to the inventory click on the bag. It works as a toggle.
The main two for the first 30 levels are coins and karma, which is used at Heart Vendors. You can see both of these at the bottom right of your inventory window without opening the wallet.The last 8 on a free account list are associated to dungeon currencies. The first dungeon is available at L30. Quite a few more currencies show up here once you have the expansions.
Achievements
The game is full of all sorts of things that will count towards achievements. You can see this by opening your Hero Panel with ‘H’ and then clicking on the circle with the ArenaNet symbol on it, second from the bottom of the icon list on the left.
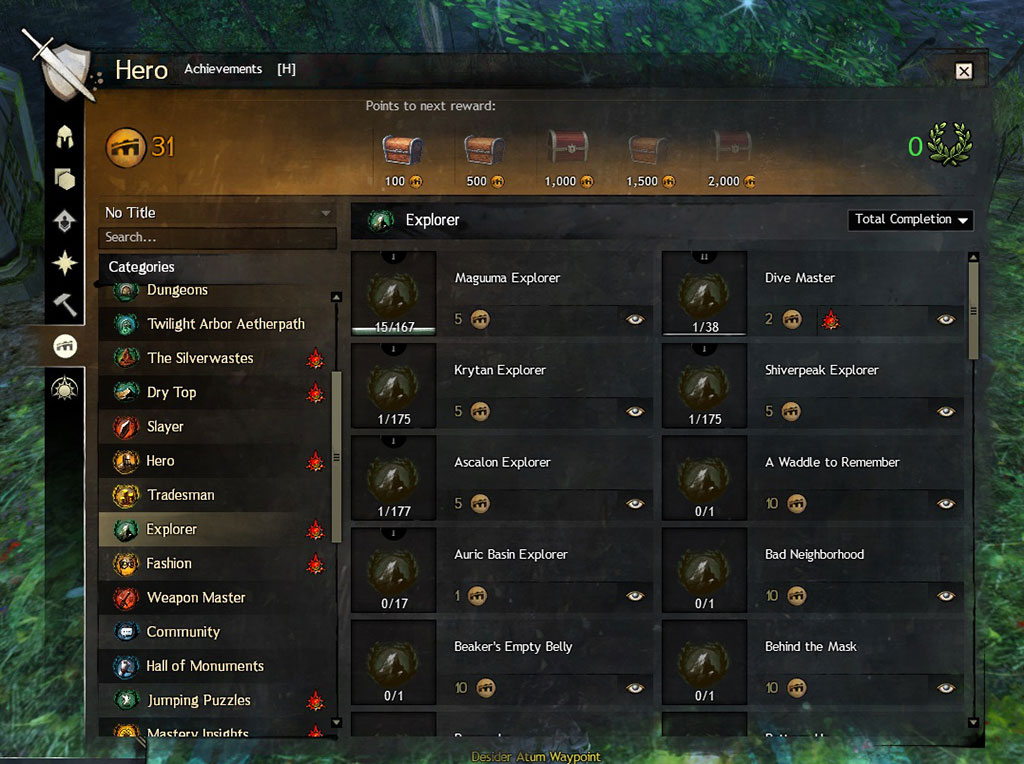
At the top left you will see the total points you have in gold numbers. Further along the top you will see chests with numbers for the points required to gain the next several achievement chests. There are no end to these and I have friends with over 26,000 points. The green number on the right is Laurels, which is another special currency for login rewards on paid accounts. You will gain access to Laurels at level 13. The main portion of the screen is a summary of your progress through daily rewards followed by three most recent achievements completed and three recommended ones. You can click on the completed or recommended achievements to open up more details.
The list on the left are the categories and some categories will expand in the list to show subcategories. Clicking on anything that does not expand further into subcategories opens up all the achievements for that category in the main portion of the window as two rows of blocks. Clicking on any of them will further open the achievement to show all details of what you need to do. Many will have a list in the details that have green check marks appear next to them when they are completed. If the achievement block is colored in, it is completed. Completed achievements get moved to the end of the list and ones you need to do stay at the top.
The ones in the General category that you will see popping up quite quickly into the game are Slayer, Hero, Exploration and Weapon Master. Simply opening the maps and killing things will start counting towards quite a few things and you will see the numbers on them to tell you the progress for each.
Fashion Wars and Other Fun Things
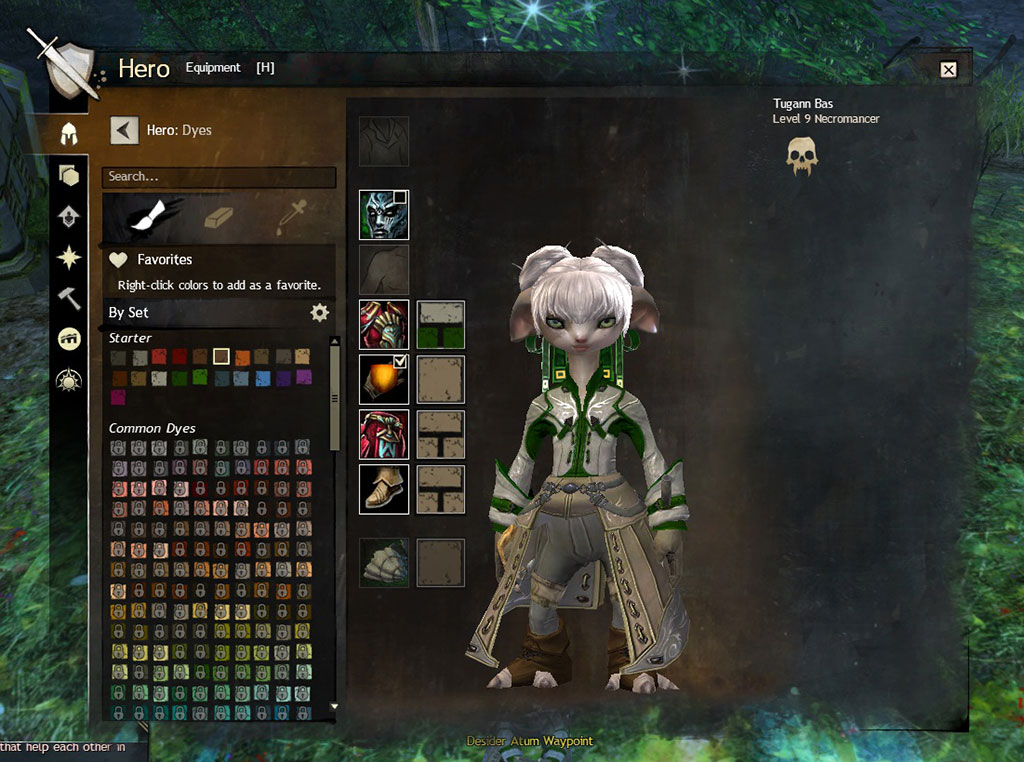
As you grow, you may find that you don’t like what the armor looks like. Even free accounts come with a few dyes to help your armor look better. Press ‘H’ for your Hero Panel, click on the Helm icon at the top left, and then click on dyes. You will see your toon and its armor with some color blocks to the right of each piece. The dyes you have will be little colored squares on the left. Anything without a lock on it is available to use.
The default on the top left is the Apply Dye and looks like a paint brush. Your mouse icon will look like an eyedropper when hovering over the dyes on the left. Left click the color you want to fill the eyedropper. Then click the block you are interested in dying on your armor to see it change on your character. Hitting apply on the right will make the changes. Make sure you click apply before you leave the dye window or your changes will not be saved.
Dying can be done as much as you like with the starter dyes. Some acquired dyes in the game will require transmutation charges and this number will be shown above the Apply/Cancel buttons.
In Equipment there is also a Wardrobe. As you acquire weapons and armor, you can acquire the skin of that item by equipping or salvaging the item. In the wardrobe window you can click on the armor and weapons shown next to your character to see skin choices on the left. Left clicking on any item on the left will change the look of the selected item on the character picture. It is not permanent until you hit Apply, but this will need transmutation charges to do, which I had none of on my free account at level 9. Also, changing skins may cause you to have to redye the item if you have already dyed it.
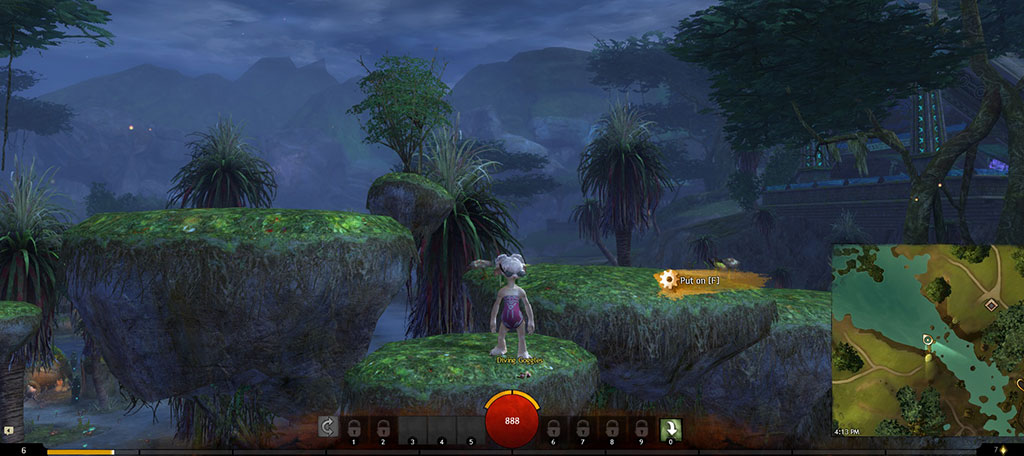
Another fun thing to find and try out are diving goggles found throughout the world. Completing these will give you achievement points. The list can be found as Dive Master in the General - Exploration achievement category. Press ‘F’ to put them on and see your character in their bathing suit and a pair of goggles. Jump off the point where the goggles are and live. You will be notified you have succeeded and it will be checked off in the list. At greater heights you have time to try out the 1 and 2 skills that show up on your command bar.
Every map has at least one jumping puzzle hidden away with various challenges of mobs and puzzles to solve, besides lots of jumping. There are achievement points for completing each of these. Some are far more complicated than others. The jumping puzzle in the starting map for the Asura is one of the more intricate and longer ones.
I did not go into crafting other than stating you can do it. At no cost you can have two active crafting professions on a character. There are crafting stations in every city and a few out in the world. You can craft with any item in your bags or in the crafting storage. You also have full bank access at any crafting station. I suggest when you get to a city to check this out. Check out all the icons that show up on the map to find the crafting stations, for example, scissors are for a tailoring station. To start a craft, talk to the special vendor by the crafting station associated.
Higher Level Unlocks
The following is a list of unlocks (not already mentioned) found as I played my free account to the upper levels:
Level 12 - crafting is fully open
Level 13 - daily achievement quests - complete at least 3 each day for 2 gold and other rewards beyond what each daily rewards.
Level 14 - Map Completion - your map will now show world completion information and your current map completion in the upper left hand corner. You will acquire mails and wiggly chest rewards upon finding everything required on the map.
Level 15 - Slot 8 on the command bar opens
Level 18 - Asura Gates - though some are restricted to higher levels based on area they go to
Level 19 - Slot 9 on the command bar opens for the last of three skills you can have equipped
Level 21 - Can train specializations (3rd icon down on left of Hero Panel) and they are listed after the initial ones you can train. Once you put HP into a specialization you can assign it to your build. Build is the second icon in the left hand menu of the Hero Panel. Click on the large hexagon that is empty and unlocked to apply the specialization to the build. The hexagons to the right open as you train the specialization to completion.
Level 22 - combat skills can combo with another player’s for greater effects
Level 31 - Elite skills open and are usable in Slot 0 on the command bar
Level 35 - Asura Gates to Lion’s Arch Open
Level 60 - WvW (World vs World) opens
Conclusion
This is a lot of information, but this game has a lot of things you can run into by level 10. I had most of this information by level 9, while playing as a free-to-play, in order to confirm things. The great thing is, despite how much this game has in it, it is not all that hard to play, as things grow and expand for your character. Sure, you are going to die figuring it out, even I did as an experienced player, but the times you pull off a great save will make up for several deaths. It won’t take long, even as a free-to-play player, to figure this game out and decide how much you want to invest into it. Happy gaming!
About the Author

Briseadh
Senior Editor
Althea joined Gaiscioch back in October of 2009 and has been here ever since with only a few month hiatus between Warhammer and Rift. As soon as she knew they were in Rift, she jumped ship to Faeblight and has followed them onward through every chapter since with a few side games thrown in for spice.
She has been an avid player of RPG style games since 1980 when she first played Dungeons and Dragons. Since then she has created her own tabletop gaming world used with various rule sets as D&D progressed. Once she could get online she played MUDs. Her MMO days started with Everquest and have moved through over a dozen games with some lasting only a month's time in her life and others going for years. She has tested several games from the perspective of a disabled gamer with hand issues due to her multiple sclerosis.
When not writing about or playing games, she can be found writing novels, reading and doing various art projects. She also writes items based on her faith and is working on publishing a novel. She also does editing for a gaming developer.
About Guild Wars 2
Guild Wars 2 is an online role-playing game with fast-paced action combat, a rich and detailed universe of stories, awe-inspiring landscapes to explore, two challenging player vs. player modes—and no subscription fees!