
A BLESSed Adventure - New Players Guide
The North American early access of Bless occurred on May 28, 2018. It’s proven quite fun to play once we got past the bumps and bruises of the first week. I have far more to explore, but it is a fun side game to put into my mix of gaming time. I’m definitely going to tag along with it for a few months before I decide how good or bad it is. Who knows what could happen and change in that time?
One of the things that keeps me in a game is a good story. So far the one for Bless on the Hieron side makes sense and has characters that are not perfect, making them feel more realistic. I won’t give anything away, but sometimes you will want to slap the NPCs upside the head for something stupid they did, or how they are acting. And thankfully I have not run into the villian that tells all their plans up front (yet), but I’ve heard them give info of what they were doing, as orders to the henchmen.
I feel it is worth taking the time to write this guide and hopefully inspire others to try the game. Everything here is based on June 2018 play time. Once published I will add comments under the article if anything changes.
The sections to be found in this guide are as follows:
- Server Selection and Character Creation
- Basic Guide
- System Setting and Keybinding
- Quest Journal
- Tactics and Combat
- Inventory, Equipment and Storage
- Wyvern Travel and Recall
- Companions: Mounts and Pets
- Gathering and Crafting
- Special Currencies
- Chatting and Friends
Server Selection and Character Creation
Once you have the game installed via Steam you will find that it does take some time to load, once you click on Play Game from the launcher. I’m not sure if this will get better over time, but for now I suggest getting the snack and bio stuff out of the way after clicking Play Now, instead of before.
The first thing you will have to do is choose a server. The important thing to remember is once you have a character made on a server, all other characters must be of the same faction on that server. If you are joining friends be sure to know both the server name and the faction in order to play with them. So what are the sides?
The Holy Hieron Empire has prospered for a hundred years, ruling over a vast territory protecting the civilized world against the invasion of the barbarian hordes.
The Union was created after the Fall War by various races in the southern part of the continent. It was forged as a permanent military alliance to stand against the Holy Empire.
Those are close, if not exactly what you will see on the screen describing each. Hieron is the lighter side and Union the darker side in how the stories go. Both have dark things happening, but each has their own way of overcoming them to meet their benefit.
The next screen after selecting the faction will be to select your race, class and gender.
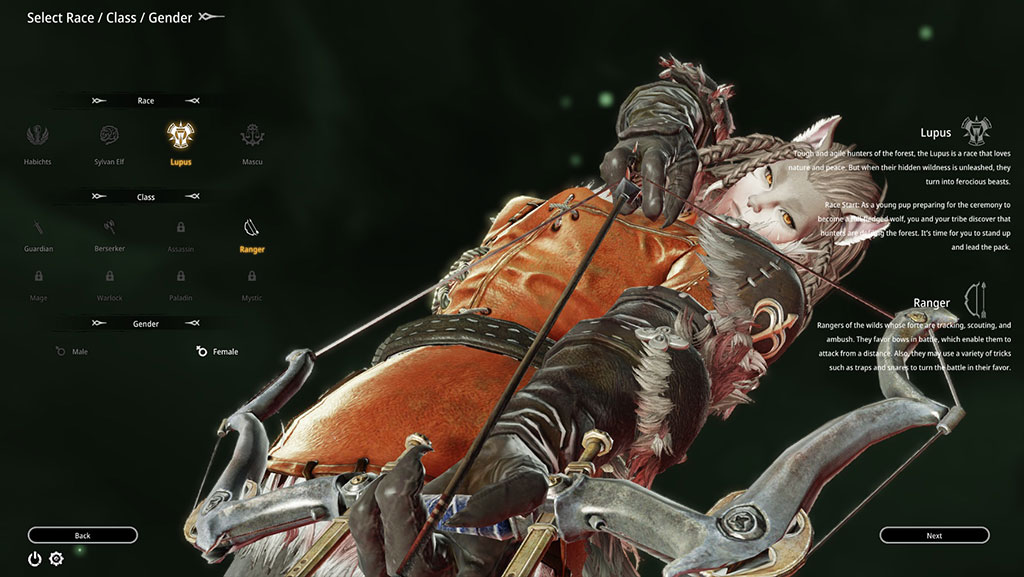
Each side has the same four races, but their cultures will vary depending on which faction you are playing. The race name is different in the opposing faction for those with differing cultural ideas. I’ll give a quick overview of each.
Hieron
- Sylvan Elf - forest dwelling elves that tend to stick to themselves unless outer forces are imposing themselves.
- Lupus - a wolf race that is highly attuned to nature and assuring it is properly cared for including controlling their own natural urges
- Habicts - the humans and ruling race of the Empire
- Mascu - an industrious, small race from another continent looking for a place to make a new home.
Union
- Aristad - humans of the free states
- Aqua Elf - outcast elves who are standing against extinction of their race
- Pantera - a wolf race that worships strength and battle prowess
- Mascu - an industrious, small race from another continent looking for a place to make a new home.
Your race will determine what classes you can play. As of early access June play, three of the classes were not available: Assassin, Warlock, and Mystic. The following are descriptions of the ones that are available:
- Guardian - sword and shield fighters who are protectors of the front line
- Berserker - 2-handed axe wielders who are fearless warriors with an all-or-nothing attitude
- Ranger - favors the bow and is good at tracking, scouting and ambushes using tricks and traps
- Mage - elemental power users to rain destruction down on the enemy
- Paladin - combination warrior and priest who wields a mace and shield and can cast healing

The next phase of character creation, once the above is chosen, is making the character look how you like. There are two ways to determine the size of the characters body by directly changing the size of body parts when highlighted on the character and dragging with the mouse, or by using slide bars in the options to the right. There are several options to open on the right for choosing hair, face and other things to adjust to your liking. Those with coloring options will have the choices appear on the right as color boxes, below the main options you can chose. You can wind up spending a lot of time on this page getting a look you really like.
The final page allows you to choose a name and determine how you want your character to sound in the game. A sample of emotion comments and shouts can be played to test the voice options you selected.
The game allows for saving the character model you created. You can make several while moving back and forth in the character creation screens before final creation of a character. The saved character models will be available each time you make a new character, if you so desire to use them.
Once the character is completed, it is holding one of the character slots for the server. If you really don’t like something about the character, you will have to delete them and recreate a new version.
You will be taken to the character selection screen once you have completed and accepted your character creation. This window will be the first one you see every time you log onto the server. From here you will click on the ‘Start’ button at the bottom to play the selected character, or you can create another one on the server if you like. You can also change the server once at this screen, if you want to create and play characters of the opposite faction, as well. Each server will allow a max of 6 characters, though only 4 will be open with the initial game. There is a way to add two more to a server with special currencies.
Basic Guide
Your first character will not have the option to skip this tutorial section, but your future characters can. A pop up will show, for future characters created, with the option of yes or no to this guide. I did the guide again on my second character in order to explain what you can expect.
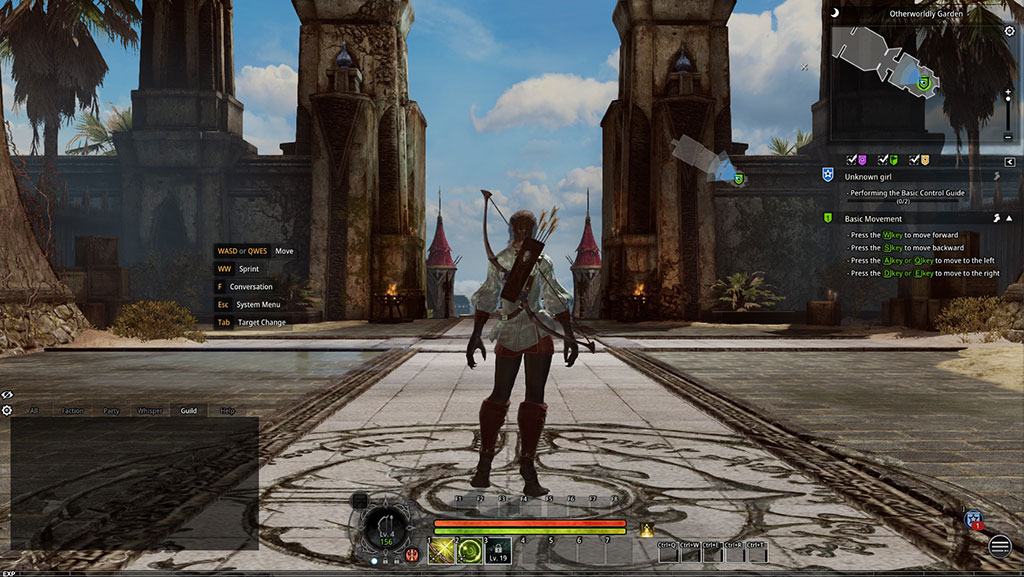
When you appear in the world you will have a minimap in the top right with your active quests below it. Your command bar with the skills you currently have set up will appear at the bottom center with a red bar to show your health, and in the case of this ranger, a stamina bar under it in green. The chat window will be on the bottom left, and the little black circle with the white/gray lines on it in the bottom right will open the main menu window. Other icons will be displayed near it as quick links to journal, inventory, etc as new things are activated or acquired. All of these will be explained further in this guide.
To move through the Basic Guide area your first quest will have you use a combo of the WASD keys until it clears to the next one. All game guide quests will have a green shield and plenty occur as you level to help you learn how to do things in the game. Make sure you do all of them to learn the game and gain experience (XP) doing it. Most of them are pretty self explanatory, but a few quests (of all types) are a bit lacking, or have some localization to English issues still for early access.
A quick list of the hotkeys that will be used a lot in the Basic Guide and beyond:
- I - inventory
- F - talk/interact - ‘G’ appears for special interactions. Once past the Basic Guide some items will have bars of light radiating from them, or they will have a pulsing glow to indicate you can interact with them. All corpses with loot will have a bluish gray light and you must use ‘F’ to loot them.
- 1 through 7- combat skills on the command bar (the basic guide will not have all of these open)
- R, T, Y - for executing chain skills (these are the default and R primary for Basic Guide)
- P - character info - where you equip armor and weapons as well as see some stats
- K - tactics - to see your combat skills and abilities.
I had to double check some of my Tactic settings after the Basic Guide, since the guide sets you to fight at level 4 so you can see enough, but you are level 2 when you hit the open world.
Pay attention to what you learn in the Guide Quests. This game is great at teaching you as you level up. Of course, I’ll be doing my best to explain a lot of the game in the following sections as another resource for you.
I explain quests, tactics and combat later in this guide to give fuller details than what you will encounter in the Basic Guide.
System Settings and Keybinding
Once out of the Basic Guide area, you can work on changing some settings and keybinds if you like. If you change key bindings before completing the Basic Guide, you may cause issues for yourself because the quests are requiring the use of the default settings.

Click on the menu button (black circle with white/gray lines) at the bottom right to pull up the menu window. The nice thing with the menu is that anything with a hotkey will have the letter by it. Most of the highly used menu options have a hotkey. System Settings, found on the bottom of the right column, is where you can work on your video and sound options. To work on the keybindings you will need to go to Interface, found at the bottom of the left column.
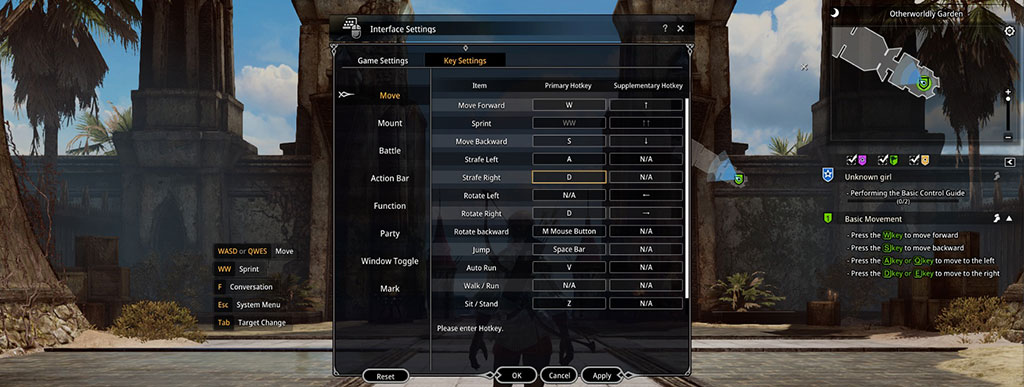
The Interface window has a menu on the left and the settings for the selected menu item will show on the right. To change a hotkey, left click on the box you want to change and it will highlight with yellow. Type the key you would like to use instead and it should appear in the highlighted box. In the screenshot above I was removing turning from A and D and changing strafe to these letters instead of Q and E. In most games I turn with my mouse, so that freed up Q and E entirely.
Under Action Bar you can choose how your combat skill keys are set. The default for the chained skills is R-T-Y. Several of us like the movement, as I did above and moved these skills over one to E-R-T, so they were closer at hand. The great thing is, this game allows a lot of keybind rearranging to make it work for you.
All icons on the screen with a hotkey will show the hotkey by the icon. You can click the icons or use the hotkey, whichever works best for you at the time. If you change the hotkey for any item that shows up on the screen as an icon, it will show the key you changed it to.
Quest Journal

All quests, except the Hunt Quests, will use symbols to mark the NPC and the location on the map where to work on the quest. All active quests, except Hunt Quests, will show in the list on the right hand side of the screen. The NPC for the Main Quests will appear in a circle of glowing blue when they want you to talk to them (shown in the screenshot above).

To view all quests, including completed ones, press ‘J’ to open the quest journal. You can also get there by clicking the blue circle with the starred shield icon in the bottom right, if it is available or click on the menu button (black circle with white/gray lines) to chose journal from the main menu that opens.
There will be five types of quests you encounter in the game as follows:
- Main Quests - denoted with the blue shield with a star - most of these lead you through the main story of the game.
- Guide Quests - denoted by a green shield - teach you something about how to play the game
- Side Quests - denoted by a yellow shield - these will appear in areas that main quests take you, after you achieve a certain section of the main quest change, or you acquire a certain level.
- Hunt Quests - denoted by a shield and a xx/xx for how many of the total, to the right of the name of the creature targeted. These start after killing the first creature with this name. In the case of the mob being for a main or side quest, the hunt quest info will appear once the main or side quest is complete.
- Royal Quests - these quests won’t open until later stages of your game play at level 45.
Tactics and Combat
You get training on how this initially works when doing the Basic Guide quests. Skills will chain together so you are not always hitting the number keys for your command bar. The command bar skills are the starters to the chain, so you will find you will do a lot of 1-R-R in the beginning with the default settings.
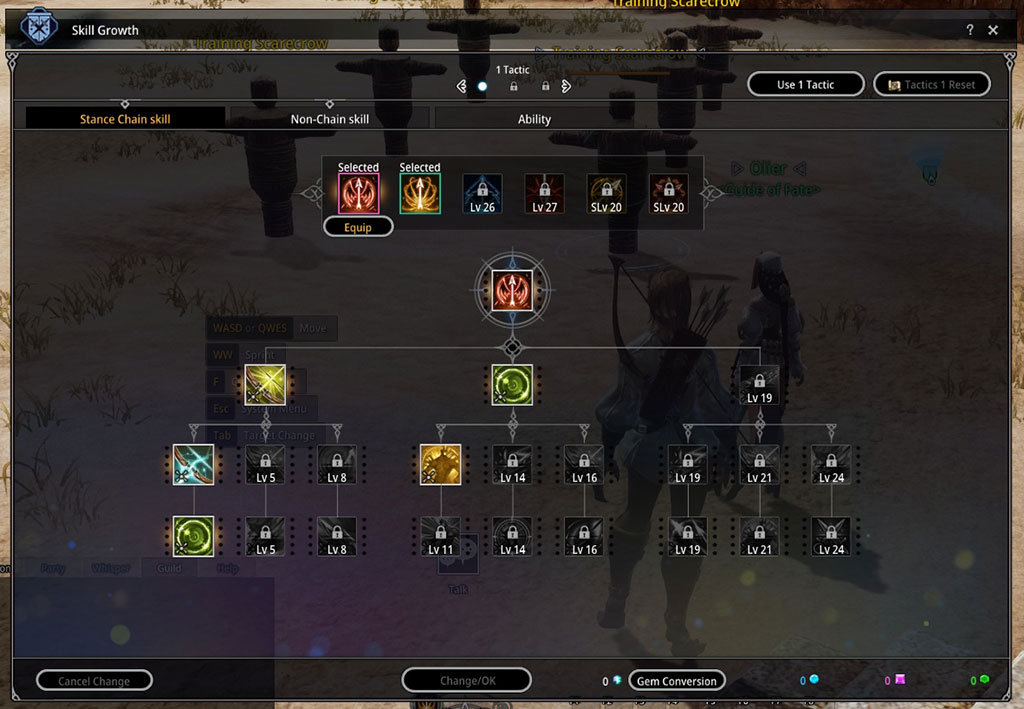
Press K to open the Tactics window. The window always opens to the Stance Chain Skills and you must click to move to the others using the menu bar across the top.
To equip a stance, click the Equip button under it in the main row of icons at the top. All of the ones available will be lit up in color, while the ones unavailable are grayed out with the level required noted. You can shift between stances with the key just to the left of the ‘1’ key when in combat. Each stance will gain more skills and power as you level. I spent most of my time in the first stance, since it fills first and then started working in the second more often after level ten or so. At least, that is how I played my paladin for the first 20 levels due to soloing a lot.
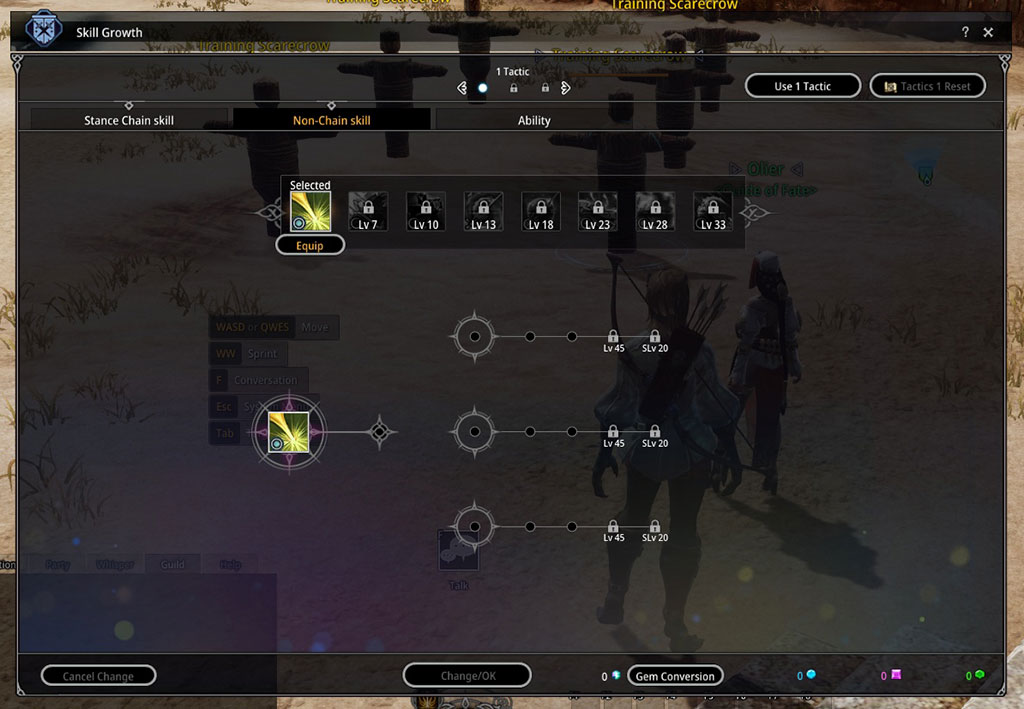
The next item on the horizontal menu near the top is ‘Non-Chain Skill’. These skills get assigned to your 4-7 keys allowing use of 4 at any given time. Just like the Stance Chain Skills, you will unlock more as you level. Each time one unlocks you should open the tactics window and equip it in order to use it. At higher levels you may find it useful to swap these between battles, based on what you may know of a dungeon or other sequence of battling.
Any of the stances and non-chain skills can be switched out when not in combat. What you cannot change is the choice of chained skills associated to a stance. You can toggle between two stances while in combat.

As you level, you will acquire three types of gems that are used for enhancing your tactic skills. They go into your inventory first and you have to right click and confirm you want to use them. This makes them show up on the bottom right of your Tactics window with how many you have. You may also acquire some that automatically add to the gem count without giving you an inventory item first.
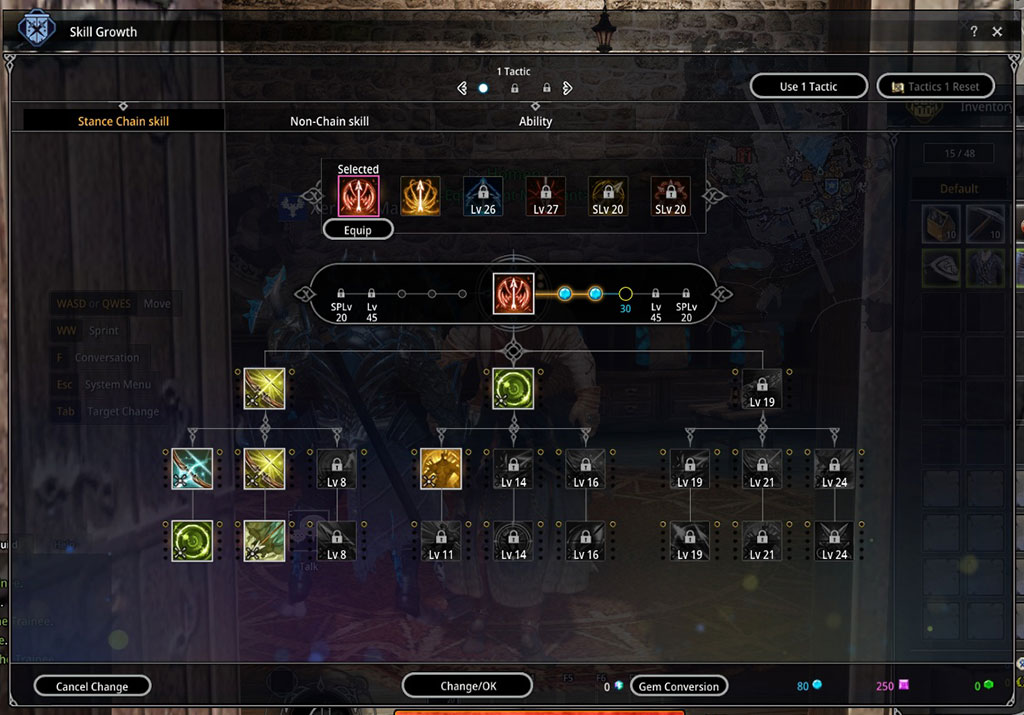
The blue gems, Sapphire, will be used on the Stance Chain Skills. Every skill in the tree can be enhanced with the gems by left clicking on it and opening a bar that spreads to both sides. You have two options but can only use one of them. If you hover over the little circles they will explain what the enhancement will do to the skill. You gain a stronger skill, but it may cost more of your power to use it, or have a longer cool down before you can use it as you enhance. This will be less of an issue once you level and have more options to switch between, even within the same stance. Click on Change/OK at the bottom to apply the choices you made.
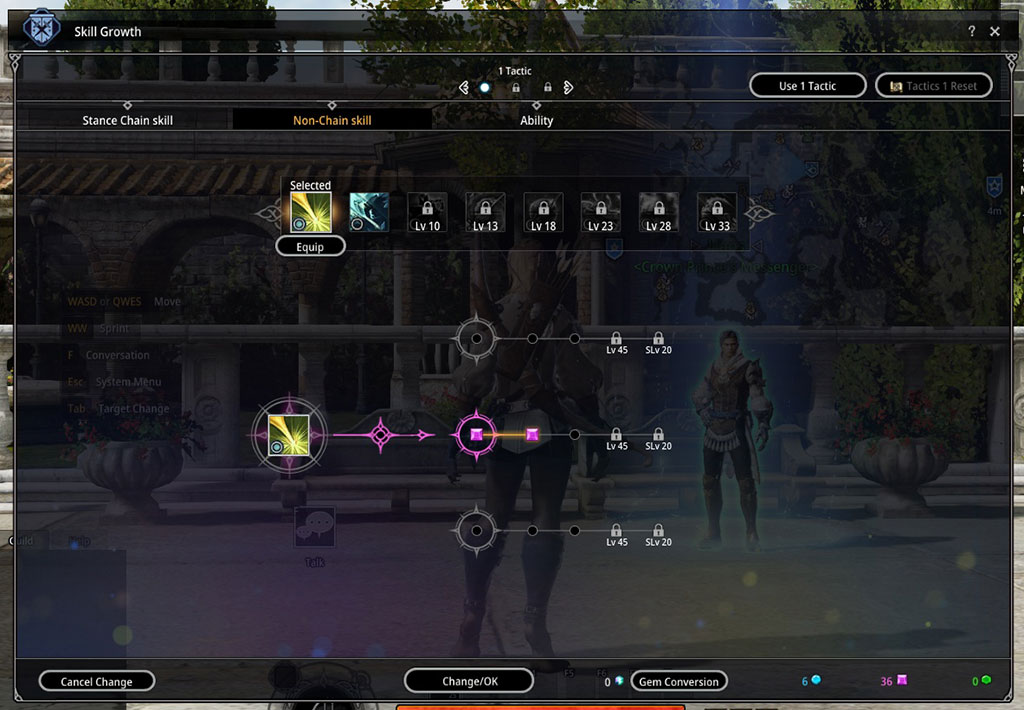
The purple gems, Rose Stone, are for your Non-Chain Skill enhancements. Each skill with have three branches to choose from. Like with Stance Chain Skills you can hover over the different points to determine what each does so you can choose the path you want to put gems into. Left click the little boxes to apply gems to the path you want to take or add onto. Click on Change/OK at the bottom to apply the choices you made.
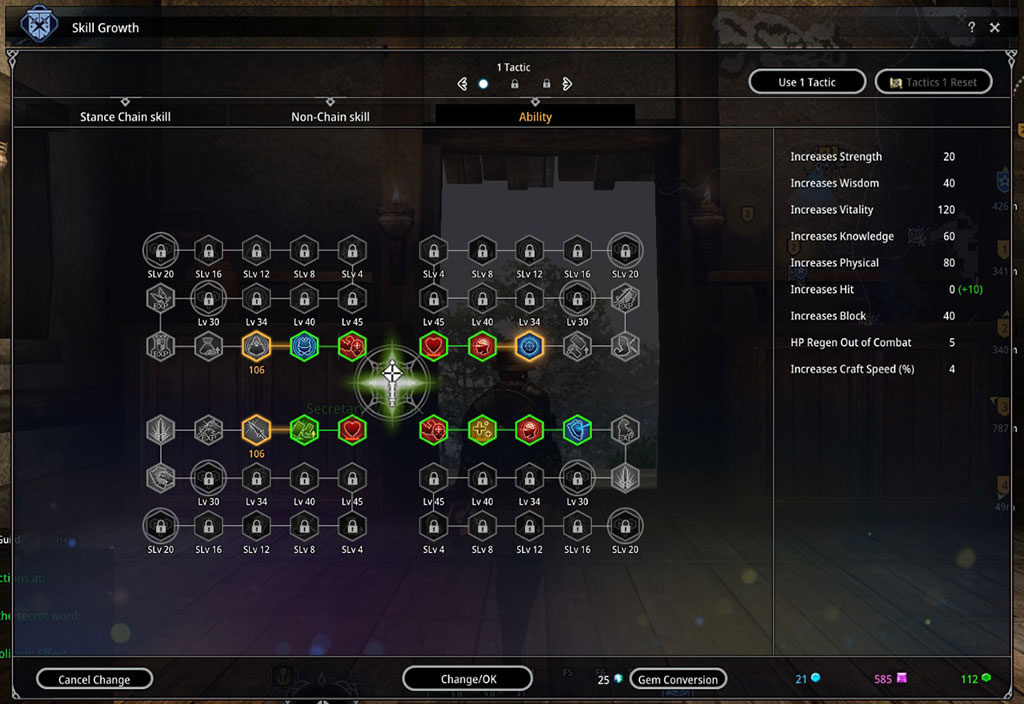
The green gems, Beryl, are for your passive abilities. There are four different paths that can be taken. I’ve started all 4, but as I level, I may aim to work on one in particular that fits what I want to do with the character. Having a start in all of them has given me some good boosts to my character. On the paladin I picked increases to vitality, strength, crit chance, knowledge and health regeneration, for examples. There are some that speed up crafting and gathering. You must follow the chain in order for each of the four paths, and you cannot skip a step in the path, even if you don’t want it.
The icons can be colored as follows:
- Green highlight with colored center - acquired ability
- Orange highlight with colored center - you put Beryls into the ability, but have not confirmed the choice.
- Orange highlight with gray center - you are of level and have the Beryls to acquire
- All grayed out - you are of level, but not to that point in the chain, or do not have enough Beryls
- Black with a gray lock - you are not at level to acquire
To apply Beryls to an ability, left click any ability box that has the orange highlight, but is grayed out, to make it change the interior to the colored design. Click on Change/OK at the bottom to apply the choices you made.
You will acquire gem fragments in chests that stack in your inventory, and every 100 can be changed into one of the gem types listed above. It takes awhile to build up to 100 so you might not have this option until much later in the game. At level 29, I still did not have 100.
Now that you know how to make sure your skills are equipped and updated, what does combat look like?
Mobs are usually marked yellow for non-aggressive and red for aggressive. Like most MMOs the yellow will only attack you if you hit them first. Be aware of area effect damage when fighting so you don’t pull in non-aggressive mobs to make the fight a bigger challenge than you want.
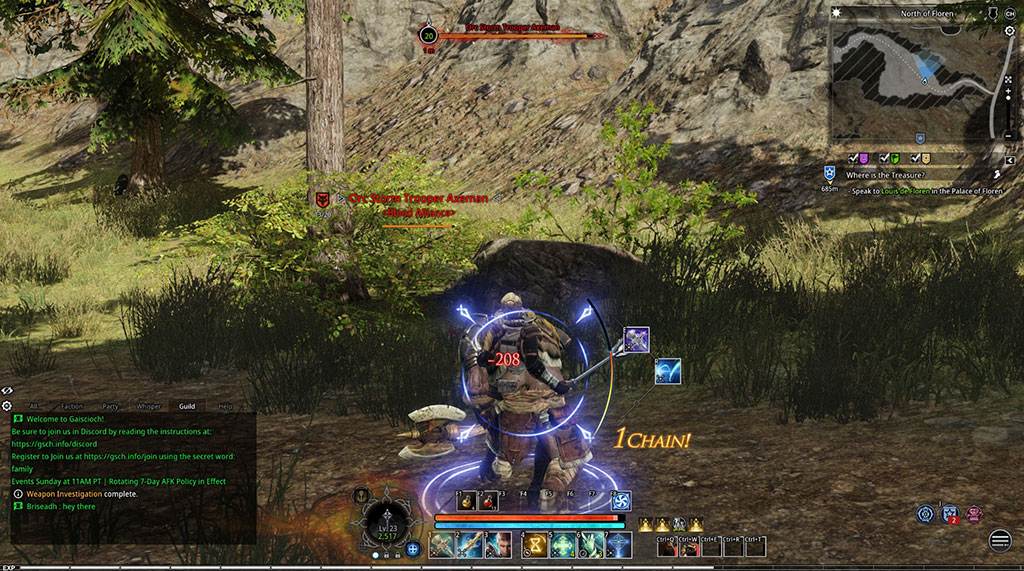
To start any chain, press 1, 2 or 3 to execute the first skill. A curved bar will pop up to the right of your character with options on it. In the case of my paladin’s setup in the screenshot above, I have two options I can execute. You must execute a choice before the curved bar fills to the top. This is where the default R-T-Y choices come in play, but you will note in the picture at this point I had the paladin set with E-R-T, per keybindings I suggested earlier. Once I chose a skill here I’ll get at least one skill to finish the chain. Study your skills some and you will soon know which combo to use for effective chaining. As an example, in the first chain stance you learn as a paladin, after you land the first hit with 1, you can then knock the enemy back with the second choice (blue square marked with an R in the screenshot above), and then hit the same hotkey again for the final shot (see screenshot below) that will make you leap onto the enemy and hit them with your mace. If I need healing in this stance I can press 2 and then continue fighting with special attacks that chain with it.

As noted above, your non-chain skills will be assigned to 4-7 on the command bar. I’m still determining the best ones to have for a variety of situations, but remember to use them as they help the fight. One of the skills for a paladin is a short term invulnerable state where you can’t do anything, but comes in handy for some of the nastier attacks of boss mobs, if you are not wanting to dodge or don’t think you’ll make it out of the way in time. It worked well on one boss in the L13 dungeon of the Hieron faction, once I figured out his tactics.
You will also notice a bar of 8 boxes above your command bar. This uses F1 through F8 as its default hotkeys. Any food, potions or other consumables you might want to have handy can be added to this bar. Open your Inventory (I), left click the consumable and drag it to one of the boxes on this bar. Once there it will be used when you hit the corresponding hotkey. It will gray out when your inventory of the item runs out. Dragging another consumable over a slot with a consumable already assigned will change the hotkey to use the new consumable.
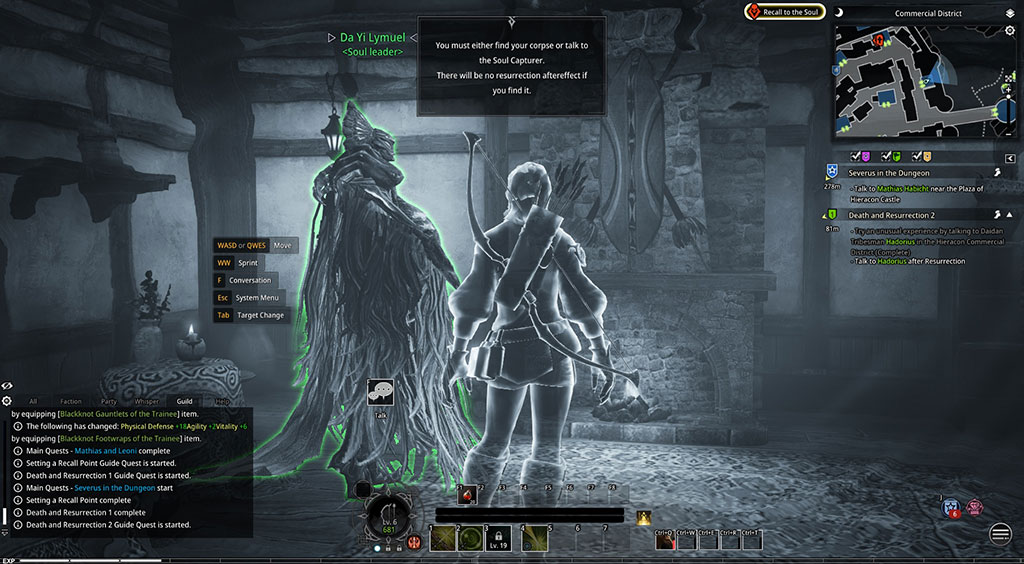
Oh, no! I died! Remember how you learned there is resurrection in the game. What happens is your spirit will appear at the nearest Soul Leader. Your grave will be marked on the map as a red gravestone with a black cross on it. I suggest running back as the spirit to your corpse since reviving near it does not give you as much resurrection sickness. Also, the distance you can be from the corpse is a decent amount, so you can usually find a spot to reappear that might not get any hostile enemies on you before you are ready. Once you have the Lumena, one of the special currencies explained later, you do have the option of spending them to resurrect if you so desire.
Inventory, Equipment and Storage
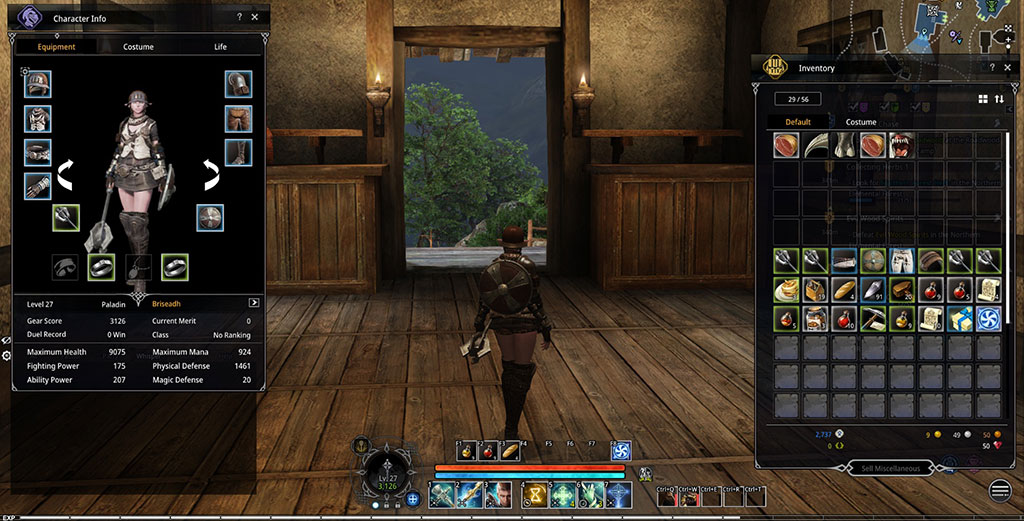
The above screenshot shows your Inventory, opened with the hotkey ‘I’, on the right and the Character Info (Player), opened with the hotkey ‘P’, on the left. As you level you will get some more slots in your inventory, or your can buy more with special currency called Lumena (explained later). Everything you loot will go into your inventory. Stackable items will go to a max of 20.
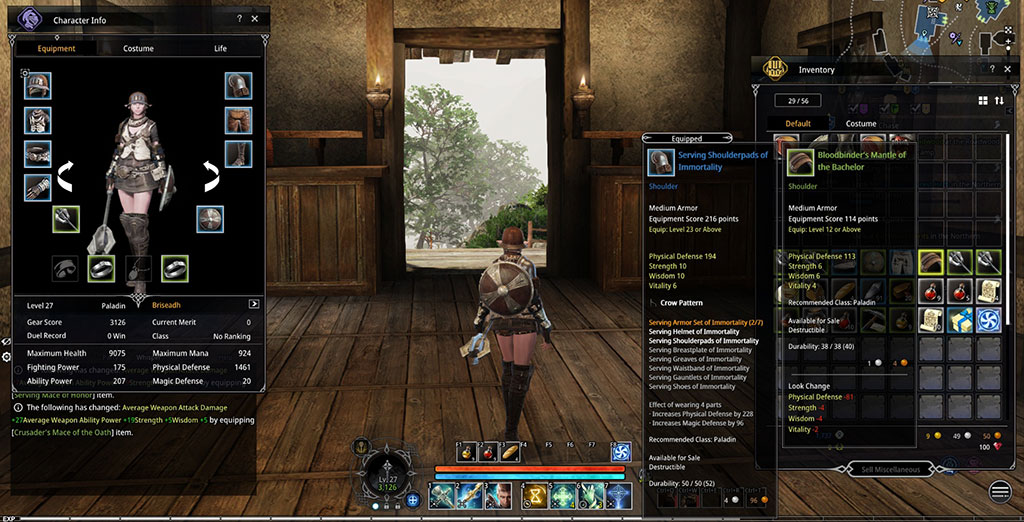
You can equip armor out of the inventory by right clicking it and don’t need the character info window open to do so. As soon as the mouse pointer is over an equippable item in your inventory, windows will pop up to show the details of the item and a window for the equipped item, if there is one, so you can compare before you right click to equip. A fast way to compare stats is on the item in the inventory, there will be a section at the bottom called ‘Look Change’. In the screenshot my comparison shows my equipped armor as better, due to the the numbers in red under ‘Look Change’. If any stat increases it will show as green.
Any gear you can equip will have its quality noted by the color highlighting the icon in the inventory, or on your character info window and the name will be in the same color on the tooltip window. The three you will see readily in the first 20 levels will be white, green and blue. With white being the least quality and blue the best. Also, many blue items will be a part of a set that will gain bonuses if you are wearing enough pieces of the set. Most of my blue quality armor was acquired in dungeons.
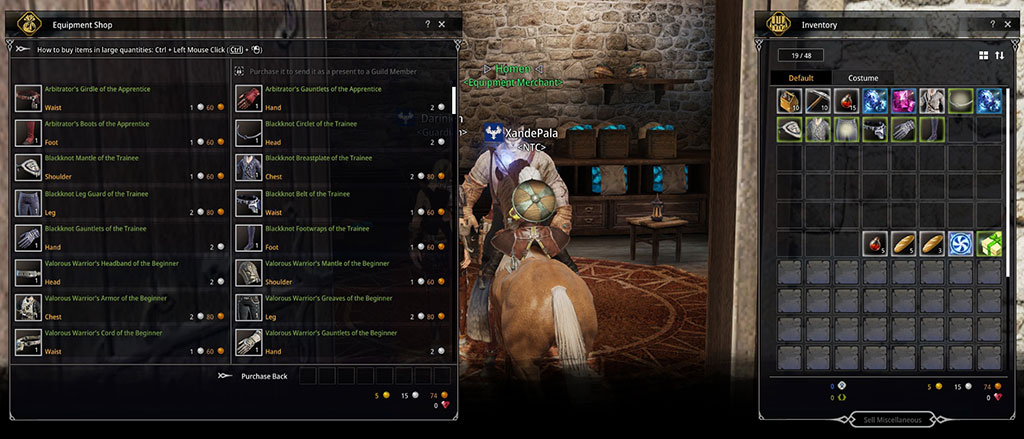
Equipment merchants will supply green quality armor, so be sure to check them just to be sure they don’t have something better. I bought more than the foot item you have to buy for a guide quest early on, to replace any starter white gear, or fill empty slots. It helped a lot doing that initially for survivability. As you level up and explore further, it will be less common to find worthy items for your use at a vendor, especially if you do the dungeons to acquire blue quality gear.
All of your weapons initially will come directly from quest rewards and loot drops. You will find a lot of your loot is weapons. There is not a vendor for weapons at this time and I’m not sure they plan on having one.
To buy an item from any vendor shown in the Equipment Shop window, right click on it and it will show up in your inventory and flash as a newly acquired item. To sell an item in your inventory to any vendor, right click on it.
There is a fast way to sell the trash items you get, which will be labeled as Miscellaneous Item in the tooltip window. When at a vendor and you have any miscellaneous items, the Sell Miscellaneous will have white words in the button at the bottom of the Inventory window. Left click it and all the junk items will be sold. The words on this button will be grayed out if you have nothing of this type to sell.

This game does have a bank called a Personal Chest, which can be accessed via the Personal Chest Manager. The storage is per character and not across your account. If you want to give an alternate character items you must mail them.
To move items from inventory to your chest or vice versa, simply right click it.
To split any stack, ctrl+left click the item to open a window. You can click and type the number you want, or use the arrow keys to the right of the number to increase or decrease it. It will always open the window assuming you want to split off one item from the stack.
What do I do with all these extra weapons and armor?
I dismantled most of mine, but you can use them to recover durability of a matching item. Let me quickly explain how to repair and restore durability of your gear before explaining how to dismantle armor.
As you explore and fight, your gear will take damage and slowly lose durability. Both are fixed at a blacksmith, who is marked on the map by a purple symbol looking like a hammer and sword.
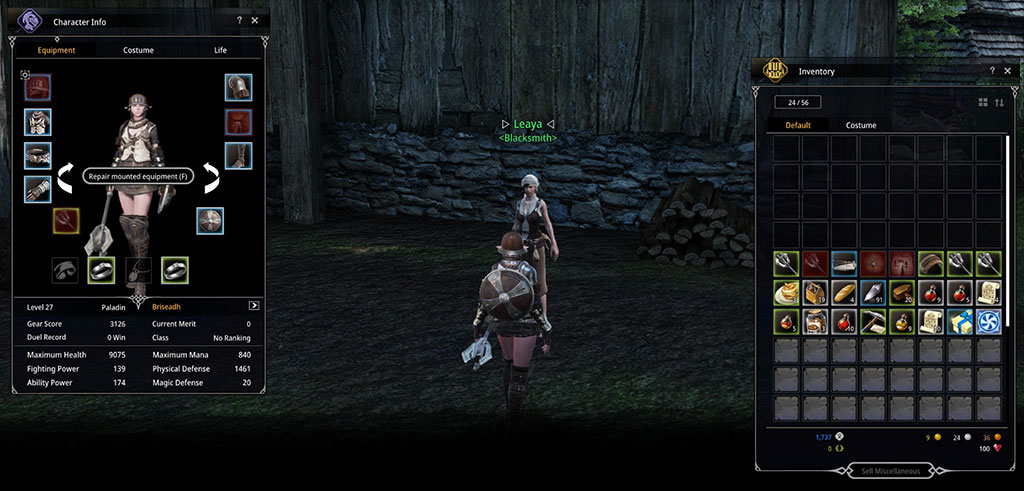
Select ‘Please repair my equipment’ and you will see your inventory and character info open with all damaged items overlayed with red. I have some in my inventory that is damaged, but not enough to want to spend money fixing it. It will be dismantled due to being lower level gear I replaced or duplicated. I prefer to click the ‘Repair mounted equipment’ on the Character Info window or press ‘F’, the indicated hotkey. A window will pop up to tell you the cost and let you accept or decline the repair. You can also do one item at a time in either the Character Info or the Inventory window by left clicking to get the repair cost confirmation window to pop up for that item only. The cursor will look like a hammer when in repair mode.
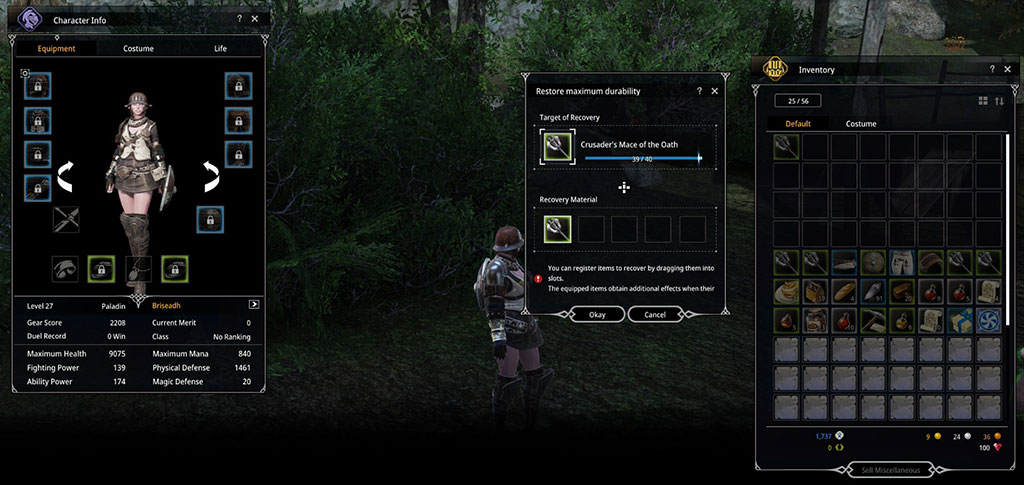
Select ‘Please restore my equipment durability’ to see all the items requiring durability restoration highlighted with red. Right click the one you want to recover durability on, so that it appears in the top box of the ‘Restore maximum durability’ window. If you have an item that can be used as recovery material, it will be bright compared to unusable items, which will be grayed out. You can right click it to fill one of the five available slots and the ‘Okay’ button will light up. Clicking on Okay will complete the durability restoration. More recovery material will be required for a greater durability loss.
Even into my upper 20’s I have not used durability restoration, since my equipment lost only one or two points before I had higher level gear to put on. Repair should be used in the lower levels, while durability will come into play once you are higher level and not upgrading armor as often.
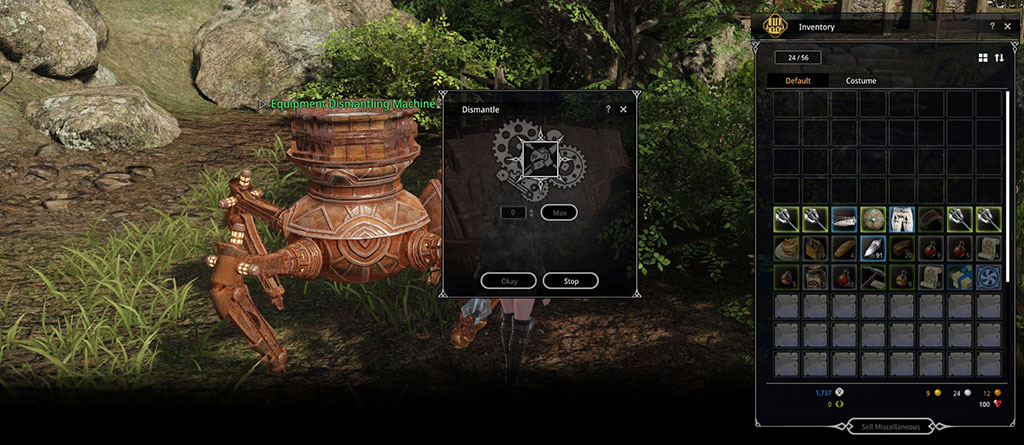
For the armor and weapons you don’t want to keep and won’t need for durability restoration, I suggest dismantling them for items that can be used in crafting. Most cities and villages with a blacksmith also have an Equipment Dismantling Machine, indicated on the map with a purple gear and sword. Press ‘F’ to interact with the machine and click ‘Dismantle equipment’. A window will pop up along with your Inventory window. Right click any item in your Inventory that you want to dismantle and it will appear in the box in the small window. Confirm that you want to dismantle and the items acquired in the process will appear in your inventory.
You can also dismantle Crystallized Magical Powder for crafting materials. Crystallized Magical Powder is acquired by completing Hunt Quests and Dungeons.
Wyvern Travel and Recall
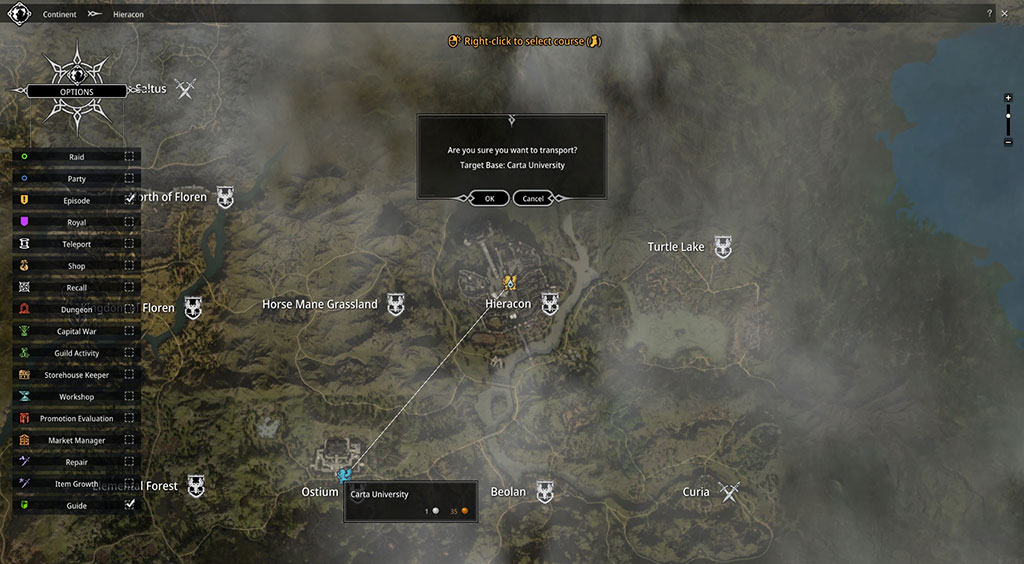
For a fee, you can travel between the cities and towns of your faction. As part of your Main Quest chain, you will learn how this works as you move from your racial home area to the capital of your faction. You will need to talk to a Wyvern Handler, marked on the map with a white wyvern symbol, in order to make the trip.
The world map will open once you have interacted with the Wyvern Handler. You will need to zoom the map out in order to find many of the places you can go. More will open as you level up.
The yellow wyvern symbol is your current location. Any blue wyvern symbol can be flown to from your current location. Click on the location you wish to fly to, and a window will pop up telling you the fee and with the option to confirm or decline the offered flight. Once confirmed by clicking on ‘Okay’, you will see your character appear on the wyvern and get to watch them fly over the world until they reach the destination. The further you go, the longer this takes. If you need a quick break, this is always a good time to do so if you don’t care to watch the scenery.
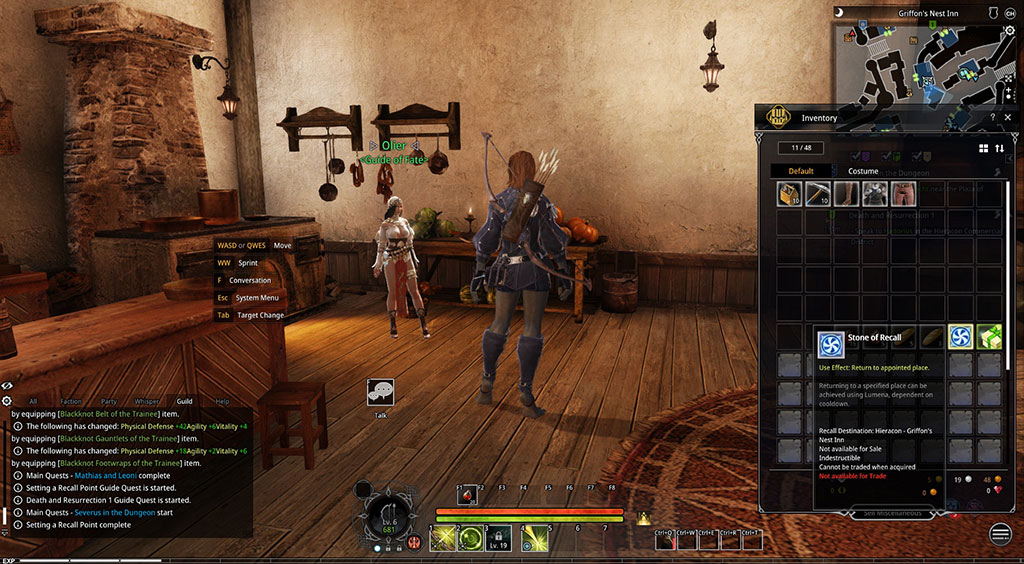
A fast way to travel is with the Stone of Recall, which you acquire fairly early in the game. You must talk to Olier to set your recall point or to change it. To use it you simply right click on it in your inventory and you will appear wherever you have it set at. If you can’t remember where it is set, you can hover over it in your inventory and the tooltip window will tell you the set location. One of the best places to set this is the main city so you can return there for free to do things like crafting or check the player market.
Companions: Mounts and Pets
You will have some quests that teach you about companions as you level. When you start out your Lesser Taming Orders will work on level 15 or lower creatures. You will acquire some of these as part of the guide quest that has you tame a pet and you can also buy them from a general merchant. There are plenty of things to tame in the world that will become a mount or a pet. You can work at upgrading them over time if you like them well enough. You can have a total of 40 companions at one time.
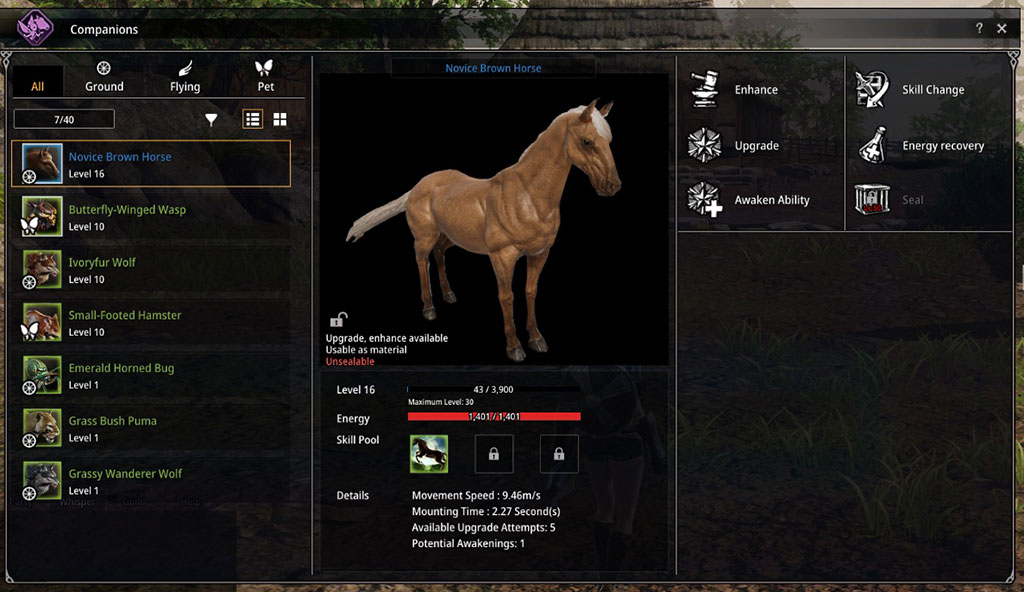
Press ‘L’ to open the window to see all your tamed companions. You can click on All to see all of them or check by type of Ground, Flying and Pet by clicking on the option in the menu bar on the top left of the window. In the ‘All’ list they will have the corresponding emblem on the bottom left of the icon: wheel for Ground, wing for Flying, and butterfly for Pet.
To see all the information for a companion, click on it in the list on the left of the window. The middle window will show the full information about the companion. The right hand part of the window is a menu of the things you can do with the companion. You will see everything on the right hand side grayed out if the companion is in use.

Left click on Energy Recovery to open up further information in the bottom right of the window. Three levels of food the companion can eat will be listed. This will be one of the primary things to watch. You have the option to feed them or switch to another that has energy when the energy runs out. They will ‘disappear’ when they don’t have enough energy to be used, so if your mount gets tired you can suddenly find yourself running. You can check the energy bar on the companion to see how full it is and it will give numbers for the amount of energy left. The bar fills with red to show the energy level. You can toggle a companion into use and back to resting by right clicking on the companion in the menu on the left.
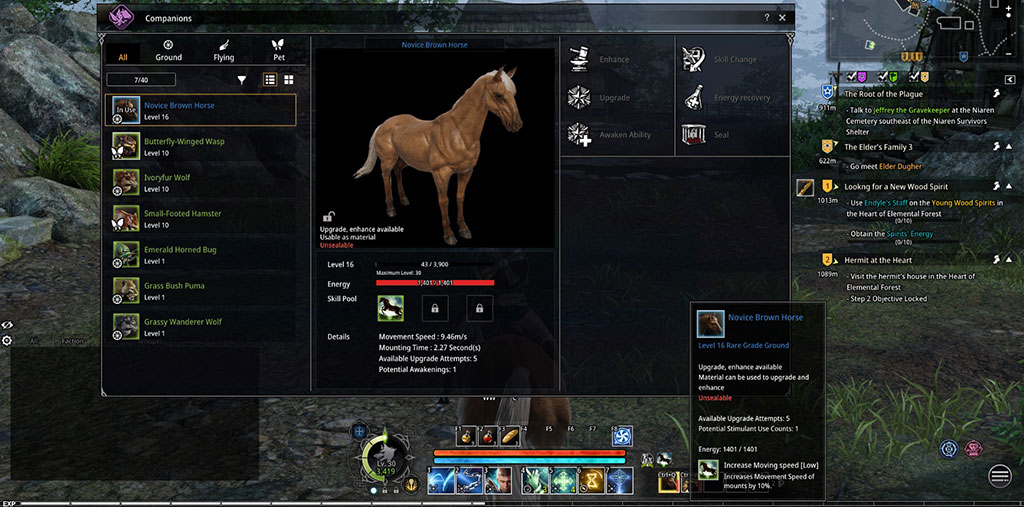
The companions can also be assigned a hotkey with a max of five being assigned at one time. To assign one to a hotkey position, left click the companion in the menu on the left of the companion window and then drag it to one of the boxes on the right side of the command bar. It will appear in the box and you will see a red bar on its right to indicate its energy level. The default hotkeys are Ctrl+Q through Ctrl+T for the five slots to toggle companions in and out of use, but you can also left click on the box where the companion is appearing to toggle it. Hovering over any of the five boxes with a companion assigned will pop up a quick information window about the one assigned to that hotkey.

To tame a creature target them, chase if they want to run a little, and then activate the taming scroll. You can either activate it by clicking on it in the inventory or put it on the hotkey bar above the command bar for quicker use.
A bar will pop up with a pointer that slides back and forth on it, with one portion highlighted in green. You must hit the spacebar when the pointer is over the green and do this four times, lighting up a small dot on the upper left of the bar for each success, before the timer runs out. If you miss twice, you can lose the chance of taming, even with time left, depending on what you are trying to tame. The timer is the green line with a countdown timer on the right side, below the bar with the sliding pointer. The green will disappear from left to right as the time runs out. I had a total of seven seconds to tame the hamster.
The creature will start attacking when you try to tame it. If you fail, you can use another taming scroll, though I don’t recommend this if the creature is strong enough to kill you before you get the next taming attempt completed. Also, you have a greater chance at failing on named mobs because the pointer will scroll faster on the bar, but it can be done.
Once tamed the creature will appear in your list of companions.
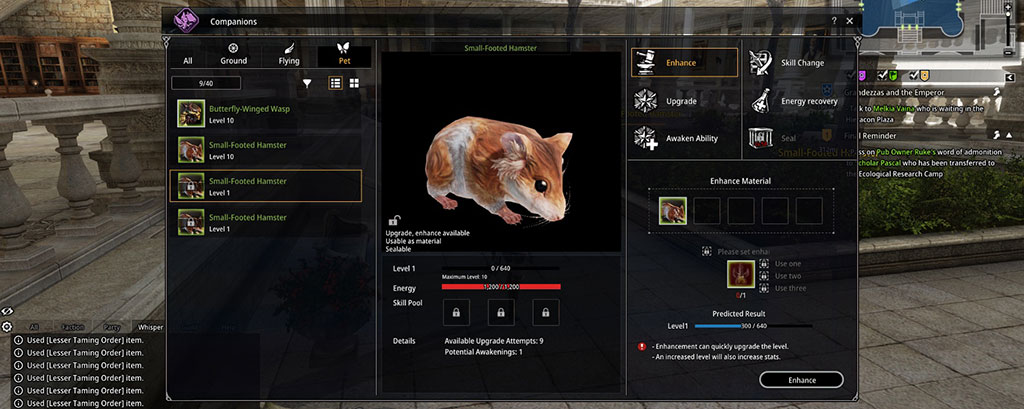
Enhancement is a quick way to level a companion, if you have enough of the corresponding type of companion and don’t want to spend the time waiting for them to level further, simply by using them. To use this option select the companion you want to enhance and then click on the enhancement option in the right hand menu area. Right click or drag a companion of the same type into any of the five boxes available. It does not have to be the same creature, but must be the same type of companion. You can use up to five companions at once in the enhancement process.
There will be a bar to show the predicted result in the lower right. In this case, adding a level 1 hamster to a level 1 hamster as an enhancement will gain 300XP of what it needs toward the next level. If you like how the enhancement will work, click on the ‘Enhance’ button on the bottom right.
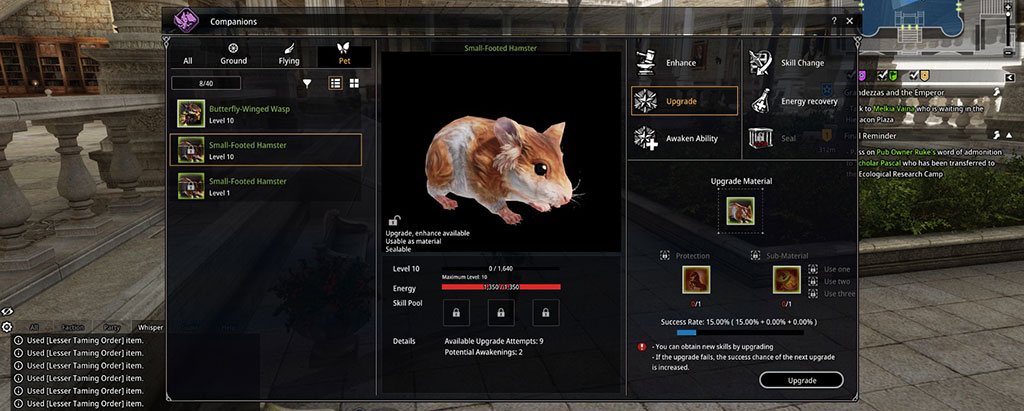
Upgrade is the next option in the menu on the right. The companion you wish to apply an upgrade to must be at its max level. The main material must be another companion of the same grade (green for green, blue for blue, etc.) and of the same type (pet for a pet, etc.). To select the companion you wish to use for the upgrade, right click it in the list on the left or click and drag it to the upgrade material box on the right.
There are sub materials that increase your chances, which you can buy from the Special Currency Store (explained later). I am still at the stage where this option is locked, but it opens up as you level your taming.
The chances of a successful upgrade will be listed with a blue bar below it indicating the percentage rate. In my example, there is a 15% chance with the companion I am using as the upgrade material. If you are satisfied with the chances, click the ‘Upgrade’ button in the bottom right. I tried for the fun of it and failed, losing the companion I used for the upgrade. The success is better if you use the same creature rather than a different one. I checked and could use a level 10 wasp to upgrade the hamster, but it was only 8% for a success rate and vice versa, the wasp would have a 5% upgrade chance with the hamster as the upgrade material.
Enhancing and Upgrading will be things you will want to use more with higher level companion acquisition and use.
If your companion has a skill that you don’t like, you can buy a Companion Skill Change Token from the Special Currency Shop with Dungeon Points or Combat Points. You will also need one of these tokens in your inventory before it allows you to make selections of the skill, or skills you want to change to in the attempt. This is worth doing on higher level and quality pets that have skills not to your liking.
Awaken Ability and Seal are high level into endgame usage for your companions. Seal is locked until you hit level 50 and two of the options for the Awaken Ability are acquired through Royal Quests, which open at level 45. I could not find the Special Currency Shop item during early access play in June for the third Awaken Ability option.
What I have explained here should help you get started with taming and at least upgrading your pets successfully. Due to this being early access information, I will make sure to work on an updated guide for companions, once everything is opened up and I can have it tested thoroughly.
Gathering and Crafting

I learned and saw gathering nodes around level 6 or 7 after completing quests in the capital city and moving on to the next area of the world. A guide quest will have you acquire both harvesting (plants) and mining (ore/rock) items to teach you about this.
In the screenshot above, my character is standing in front of a plant that can be harvested. I can press ‘F’, per the icon that popped up to my left, to collect or click on that icon. A box on the lower right will tell what the plant is, and I need to have the proper harvesting tool in my inventory. I have the tooltip box up by hovering over the one time use gathering bag. You will use one per node harvested and this type of tool is the first you will see for harvesting and mining from the guide quest and vendors. Later on you will acquire and find tools that will last for an hour of gameplay. I like to use the timed ones for a straight harvesting run and the one time use ones for picking up random things on the way during questing and hunting.
Any node that can be harvested will pulsate with a light. Mining nodes tend to be more of a dull red, but the plants can be lit up yellow or orange as in the screenshot above. This makes it easier to see them as you roam the world. The information of what it is and the icon letting you know you can collect it pops up as soon as you are in range.
To start, I gathered up everything I saw so I had it on hand when ready for crafting. I quickly found out that when you are ready to craft, you must pull the items out of storage. You will only craft with what you have in your inventory at the time.
You will not be able to start crafting until level 14, upon which time you will get to choose a main crafting profession and a sub crafting profession, via a guide quest. To get all of the crafting professions you will need more than one character. I chose enchanting and cooking on my main character, because you can make items to enhance your armor with enchanting and cooking allows you to make your own food for buffs, as well as, food for your companions energy restoral.

A great note is that you can do simple crafting at any crafting workstation in the game, and later on you will be able to afford portable ones, if you so desire. For expert level crafting, you will need to use the appropriate workstations in your factions capital city, if your portable ones are not of that rank.
The crafts you know will show up on a bar near the top of the window and you can click on the one you want to work on. The recipe menu is on the left and selecting a recipe will show what is required to make it, including the crafting level on the right side of the window. Some of the recipes you acquire, upon learning a craft, may require leveling up the craft before you can use them. Other recipes can be bought with Dungeon Points (see Special Currencies below) from the Master of your crafting profession, or found as loot in the world, depending on the craft. Blue quality armor recipes can be found in dungeons quite often.
Your choices of crafting professions are:
- Enchanting - main
- Armorsmithing - main
- Handiwork - main
- Cooking - sub
- Alchemy - sub
It will take a lot of materials to level your crafting. For instance with Enchanting you will make a lot of Stone Tablets and it takes 3 Stones to make one tablet. Most of your Spirits (used to enhance armor) will take 7 Stone Tablets and a lot of stone goes into making taming orders, 9 stone for the lesser used on level 15 or lower creatures.
I plan on making a full crafting guide in the future, once things have stabilized in the game and I’ve had a chance to get beyond the novice level.
Special Currencies

Lumena is one of the currencies you will need to use in the Special Currency Store. The way to acquire this in game at the lower levels is through Dungeon Points, which are acquired from dungeons and completion of Hunt Quests. You can exchange up to 1000 Dungeon Points or Combat Points for 50 Lumena per day. Later on your character will start to earn Combat Points in PvP as another option for acquiring Lumena. The Dungeon and Combat Points can also be used for some items in the shop. Dungeon Points are also used for buying most of your crafting recipes, so you should balance out what turns into Lumena and what you keep to buy crafting recipes.
To exchange points for Lumena, click on the System Menu button on the bottom right of the screen to open the menu. In the center row near the bottom of the menu, click on ‘Exchange Office’ to open the ‘Lumena Exchange Center’. There are two things that can be exchanged for Lumena: Dungeon Points (white symbol and blue numbers) and Combat Points (green symbol and numbers). To choose the one you want to exchange, make sure the radial button in front of it has the white dot under ‘Exchange Currency Select’. The fastest way to exchange, if so desired, is by clicking on ‘Max’. However, if you don’t want the max, you can change the amount of Lumena you want to acquire with the number box between the ‘Min’ and ‘Max’ buttons. The expected exchange will be listed at the bottom of the window, showing how many Lumena you will get and what is being spent to acquire them. Once you click ‘Exchange’ at the very bottom of the window the transaction will be completed.
Lumena, Dungeon Points and Combat Points are per character, not account wide. To buy things for a character out of the Special Currency Store, each must earn the currencies to do so.

To check out the Special Currency Shop you can click the pink icon near the bottom right corner, close to the menu icon, or go to it via the Main Menu. The categories of things you can buy and the currency required will show as a menu on the left and the items you can buy will show on the right with their cost.
Chatting and Friends
I put this near the end because it is pretty straightforward and like most MMOs these days.
The chat window has several tabs to break up chat for ease of seeing it, because in ‘All’ it will scroll by pretty fast. You can select the channel you want by clicking on the box on the bottom left that will say ‘Normal’ until you change it. A list will pop up and you can click on the choice there. All of them list the quick command to type for each channel available.
If you click on the gear on the upper left you will be able to change the colors of chats, if that helps you see them better. You can also change what you see on each tab to customize them. I made my guild tab also show normal, party, raid, and whisper, so I don’t miss important stuff from friends. If I want to check out the other chats, I go to the default tab already set for them.
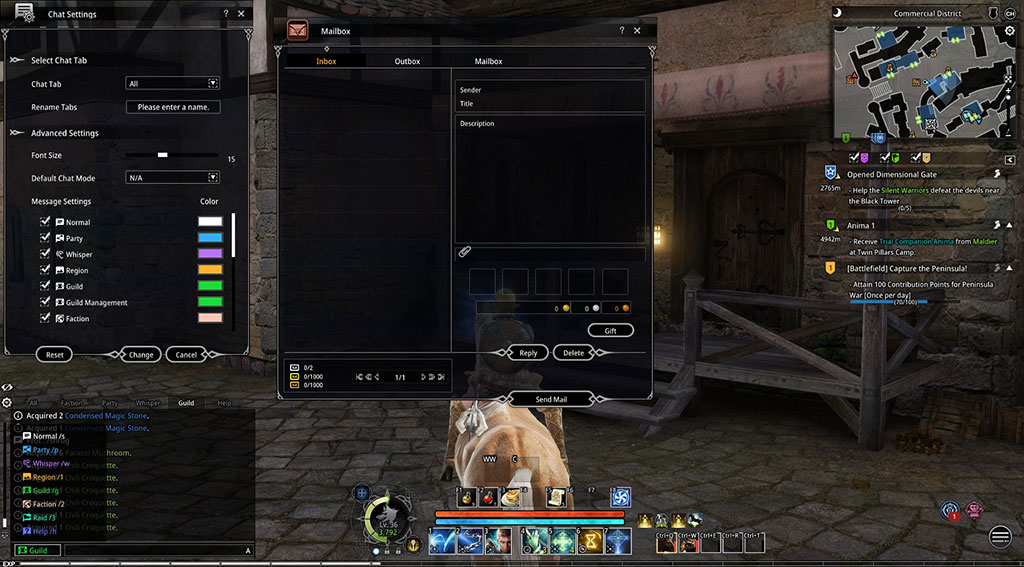
Mail (hotkey default is U) is another option to share information, along with items and money. You will have to use mail to share things with other characters you make. Whether you are on the Inbox or the Outbox tab you can click on the Send Mail button on the bottom right to pull up the Compose Mail window. The nice thing I like about the outbox is that it will show up to 100 mails you sent out and you can see exactly what was sent, including items and money. The bad part is that currently you can only have 2 emails in your inbox before it says it is full. You will need to be diligent about this if you expect several mails, because the third person will be blocked from sending you anything until you clean out the inbox.
Friends are by character, so if your friend has more than one character, you will have to add all of them to the list. The list is reached through the System Menu only. It is a very simple window with the list of friends in online and offline groups. To add a friend, simply click the Add Friend button, type in their name, and confirm it. This is also where you find the Block list if you really feel the need for that.
Inviting people to a party is simple. You can left click on their name in chat to select Party Invite. If they are next to you, you can target them and click on the target bar top center of the screen and invite. You can also invite off the guild list. This game gives bonuses for grouping up, even for crafting. The leader can select the Party Effects that will help the party the most based on fighting, crafting or gathering. There are enough options to make it worthwhile for the leader to keep these set appropriately.
Conclusion
The game is fairly helpful in how it helps you learn, but not everything is well explained, or seems to stick with some players in how the quests are set up. This is why I decided to make this guide, even if the game is still in early access. Look at comments below, in case I have updates, as the early launch progresses and things solidify for the game.
About the Author

Briseadh
Senior Editor
Althea joined Gaiscioch back in October of 2009 and has been here ever since with only a few month hiatus between Warhammer and Rift. As soon as she knew they were in Rift, she jumped ship to Faeblight and has followed them onward through every chapter since with a few side games thrown in for spice.
She has been an avid player of RPG style games since 1980 when she first played Dungeons and Dragons. Since then she has created her own tabletop gaming world used with various rule sets as D&D progressed. Once she could get online she played MUDs. Her MMO days started with Everquest and have moved through over a dozen games with some lasting only a month's time in her life and others going for years. She has tested several games from the perspective of a disabled gamer with hand issues due to her multiple sclerosis.
When not writing about or playing games, she can be found writing novels, reading and doing various art projects. She also writes items based on her faith and is working on publishing a novel. She also does editing for a gaming developer.